I just picked up an Elegoo Mars 2 Pro on a Black Friday sale, and finally managed to complete my first print with it! I learned a lot along the way, so I thought I'd share with my 3d-printer interested friends.

Understanding the Resin Process
The process for printing a resin object is:
- Get the model (STL file)
- Slice the model (creating a CTB file, probably)
- Set up the printer
- Print the model
- Wash the model
- Cure the model
... there's a lot of ancillary cleanup along the way, as well. Resin is both smelly and messy!
Before You Start
What comes in the box with the printer is nowhere near enough to actually print something successfully.
To start with, you're going to need to answer a few questions:
- Where am I going to print?
- What resin am I printing with?
- How safe do I want to be?
- How am I going to wash the model?
- How am I going to cure the model?
The answers to these questions can be simple or complicated. "Simple" or "inexpensive" in this case may not be the best solution - it may involve other negative externalities like "making more of a mess" or "potentially causing health problems."
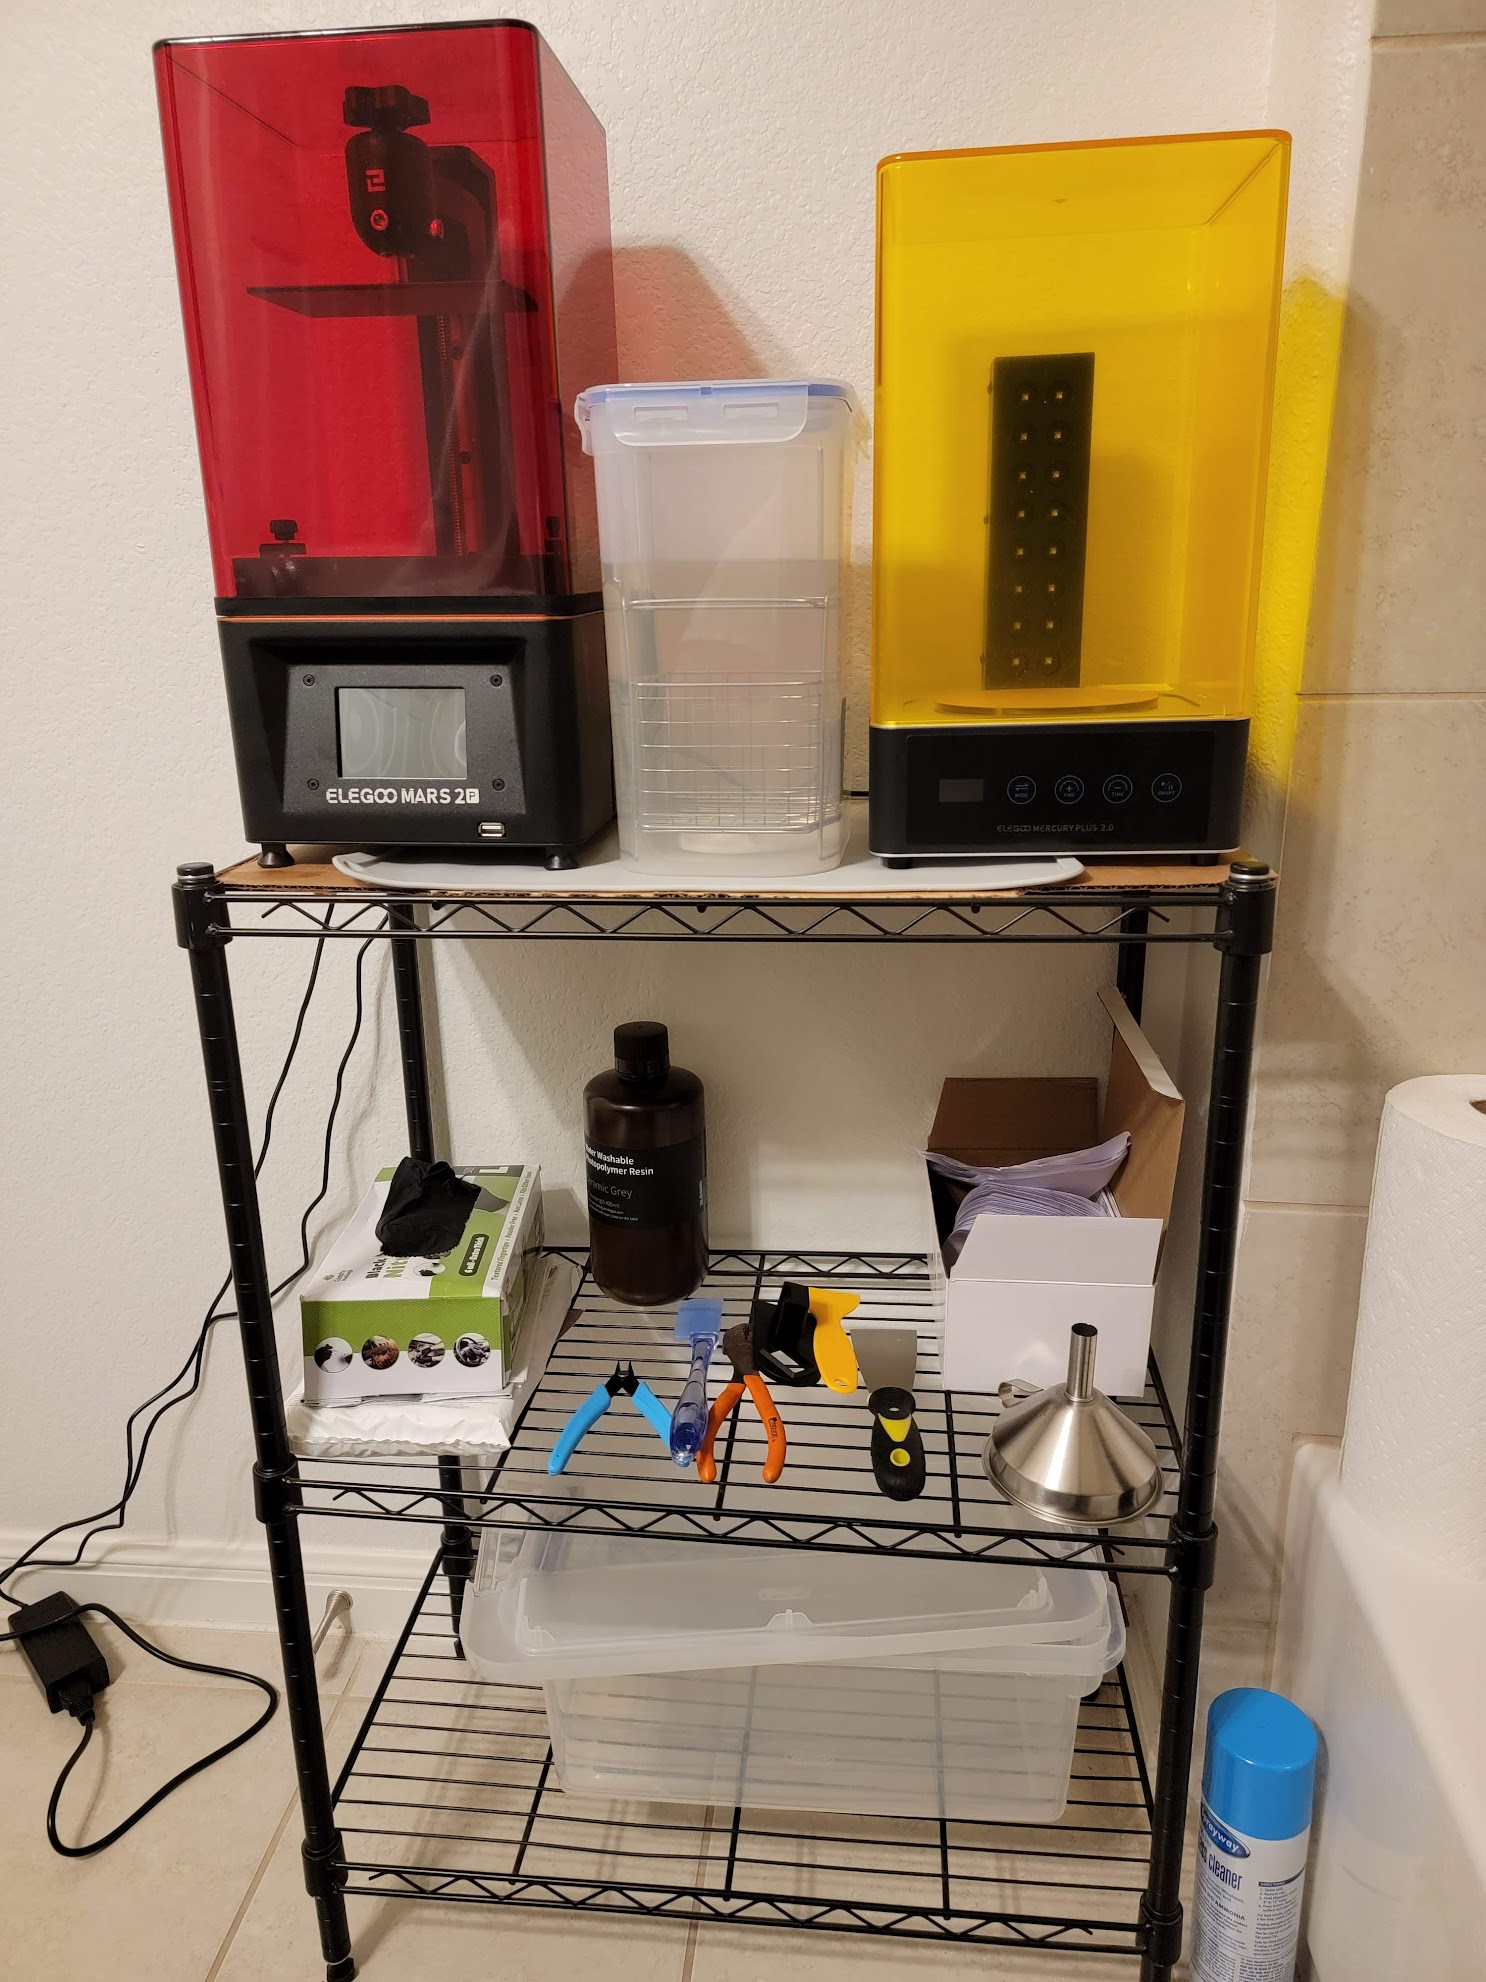
Minimum Requirements
A place to set up your gear. Ideally, this is somewhere well ventilated, reasonably climate controlled, but free of UV light. So, a guest bathroom might be a good pick. Garages can be OK, so long as it is a comfortable temperature - outside of "typical" room temperature, resin can start to misbehave and your prints will fail as a result. Since resin smells and the fumes are potentially toxic, you don't want to do this in a room that you have to, say, sleep in.
A bottle of resin. There are many varieties of resin, with different properties. I picked a neutral gray, "water washable" resin from my printer's manufacturer (Elegoo).
People have strong feelings about "water washable" resin. Some swear by it, and some swear at it. Typically, resin prints have to be washed in isopropyl alcohol. Water washable resin prints can be cleaned with plain water, which is more convenient. However, the wash procedure is different for water washable resin, and some users of this type of resin choose to use isopropyl alcohol anyway, since overexposure to water can make water washable resin prints crack.
Some way to wash the print. Since we're talking about washing, let's discuss it in more detail. Once something has printed, it is still coated in uncured liquid resin. We need to remove this excess liquid, or it will interfere when we try to do the final cure on the printed object. Usually this process takes about 5 minutes, but it can vary depending on the resin and the object.
Standard resin dissolves in isopropyl alcohol. If you're using this type of resin, at a minimum, you need a resealable container of isopropyl alcohol large enough to accommodate the object(s) you are printing. If you picked a water washable resin, you can use water instead - but note that water washable resins have issues if they are soaked in water - you need to use running water. And it's a bad idea to wash uncured resin down a drain. So you're going to have to work out some system by which you can pour water continuously over the print without immersing it.
As anyone who owns a washing machine can attest, thoroughly washing an object requires agitating the washing liquid and/or the object being washed. You can do this by hand, or you can get a machine that does this for you.
Many resin printer manufacturers make "wash stations" that contain some type of agitator, and even accept the print bed from your resin printer directly, without having to remove the printed object first. They can be expensive, but they're the most turn-key solution.
Some way to cure the print. The printer will partially cure the object during the printing process, but once it is washed the print will need to be fully cured. Usually this curing requires some source of UV light.
At the cheapest end of the spectrum, the sun is a (for our purposes) infinite source of UV light during the daytime. Leave prints outside, come back later, they're cured. This doesn't work so well during the nighttime or when the weather is poor, however.
A slightly more expensive option would be to put the print in a box with a UV light source. For instance, a strip of UV LEDs, or a UV lamp.
The fanciest solution is to buy a "cure station," which is often an enclosed setup with a UV light source and a turntable. (There are also all-in-one "wash-and-cure" stations available)
Safety Gear
3D printer resin is a chemical that can be hazardous to your health. You don't want to get it on your skin, in your eyes, and you should avoid breathing the fumes it gives off.
You could say "YOLO" and just go for broke without any safety gear, but I don't recommend this.
At a minimum, I suggest owning and using:
- Respirator w/organic filter cartridges
- Disposable nitrile gloves
- Eye protection that is compatible with your respirator
If you want to do more, a chem-resistant apron would be a good idea. Getting this stuff on your clothes is no fun.
You can skimp on the safety gear, or for less than $100 you can take out some literal health insurance. Nobody wants health issues in return for saving a few bucks on printed resin trinkets. Be smart, take care of yourself!
Cleaning Supplies
Resin is a liquid, and you have to move it around and work with it in several stages, so things are going to get messy. You're going to spill it, drip it, splash it, etc. Plus, once you're done using it, you've got a bunch of dirty, contaminated objects that you've got to clean up between uses of the printer. There are a bunch of things you can do to make this simpler.
- Silicone mats - Get one with a lip to contain small spills. Have enough surface area for your printer plus your wash/cure environment, plus some to put your contaminated tools down on.
- Funnel and funnel filter(s) - When you're done printing, you need to return excess resin to the bottle. (Ideally, you keep this recycled resin in a different bottle from your 'virgin' resin). This resin needs to be filtered so that small particles of hardened resin don't end up in the printer's tray the next time around. You can use a metal funnel with a fine mesh strainer, or you can use a regular funnel plus disposable paper paint strainers.
- Scrapers and/or spatulas - Resin drips slowly, and sometimes you're going to want to speed it up. to do this, you can scrape it with a tool, but pick something soft so that you don't damage critical surfaces.
- Paper towels - once resin gets on something, you're going to need to soak it up. Paper towels are good for the surfaces that don't scratch easily. Plan on tearing a few off before you start work, or have a paper towel holder you can work one-handed.
- Microfiber cloths - For delicate surfaces, paper towels are likely too rough and will leave paper residue behind. Microfiber cloths are safer, but they're going to end up contaminated and be trash after they're used, so be warned!
- Ammonia-free glass cleaner or isopropyl alcohol in a spritzer - some sort of cleaning solvent, for those areas that need more thorough cleaning.
- Clear plastic bin with airtight lid - very useful for holding disposable contaminated items like cloths, paper towels, disposable gloves, etc. Once the cleanup is over, you can take this outside and let the resin harden, making it just standard garbage.
My Shopping List
Here's the stuff I ended up buying to go with my printer. I picked each of these items based on reviews, cost, and how well it suited my needs. Feel free to make substitutions if you notice that something is out of stock, different than what you need, etc.
Basics:
Safety:
Cleanup:
Models & Slicing
Using ChiTuBox
Okay, all the supplies are collected. Let's talk about how we tell the printer what to print.
Similar to other types of 3d printing, everything starts with an STL file. You can find these on various sites, or make your own with tools like Blender, TinkerCad, or Fusion 360. I won't go into that today; let's just assume you already have a model you'd like to print.
In order to get that model ready for printing, we need to use a slicer. For the most part, resin printers support sliced models in CTB format, which is produced by the ChiTuBox software.
This software is closed source, but has a free version that is "good enough" for most printing needs. It's not perfect, and it has a learning curve, but it works!
ChiTuBox comes with profiles for most major printer manufacturers and models. The first time you load it, you will want to go into the settings and switch from the "defaults" to the settings that correspond to your printer.
Once that's set, you can load your STL model. ChiTuBox will place the model in the center of the build plate. From here, you can scale, rotate, and move the model around.
Note that it is common in resin printing to print multiple models at once, and to vary the location of models from being dead center. Resin printing prints an entire layer at once, so the print time doesn't vary depending on the X or Y dimensions of what you're printing, but only in the Z.
Once you have your model(s) arranged how you like them, you should probably add supports. This is the second tab on the right side of ChiTuBox. In resin printing, there's no ability to do "overhangs" or similar - if something isn't supported, it will just solidify in the middle of liquid resin in the tank, and may get in the way of future layers.
You can either let ChiTuBox place supports for you, or you can do it yourself. I recommend starting with the automatic defaults, as they're usually good enough, although you might have to add more supports after the automated support routine runs.
Supports ready? Good! Now it's time to slice. Go back to the first tab and hit the "Slice" button. This will change the main view of the model to include a layer-by-layer breakdown of what solid resin will be created at each layer. If you're satisfied, you can click "Save" to create the CTB file your printer needs.
Double Checking Your Work - Islands, Resin Traps, and Suctions
Earlier, we talked about the dangers of unsupported bits of the model. We don't want to create little floating bits of plastic in the printer's resin vat; this will lead to issues with the print process. These unsupported bits are called "islands."
It's also possible to create a little reservoir of uncured resin inside a model. Since it has different properties from the solid around it, this liquid resin might expand or contract in a way that damages the model. This is called a "resin trap."
Finally, sometimes a model might print in such a way that it creates a little suction cup on the print surface. These cups can damage the printer if there's no way to equalize the pressure inside the cup and outside it.
When you're doing the final export of the CTB file from ChiTuBox, you may notice that the buttons on the toolbar changed - the left button allows you to detect islands, and the right button will attempt to automatically remove them. This works, most of the time.
However, ChiTuBox doesn't do anything about resin traps or suction cups. I suggest downloading UVTools, an open source CTB checker. It can go over your CTB file, and find many of these potential issues. It can auto-fix a lot of them, too.
Printing, Washing, and Curing
Okay, this is it! Time to actually Print A Thing!
Oh, you did do the initial calibration of your printer, as it tells you to in your manual, right? Just checking!
- Set up the printer. Secure the build plate. Check the resin vat for damage, and secure it to the printer's base. Turn on the printer.
- Add resin to the vat, paying attention to the "max" fill line (you don't want overflows!)
- Load and print the model. (Yay, we are Doing The Thing!)
- Let the model drain. As much as possible we want to reuse the liquid resin, and that way it won't drip as much on the way to the wash station.
- Wash the model. Make sure you're using the correct solvent in the correct way! I set my wash and cure station for ~5 minutes of washing and come back when it's done.
- Remove the supports. No point in curing these, it'll just make it harder to remove them.
- Cure the model. Let the UV light do the trick! In my wash and cure station, this takes about 5 minutes.
- Drain the resin vat. Assuming you're done printing for the day, pour the leftover resin through the filtered funnel and back into a safe container.
- Clean your tools and the work area. Clean the build plate, the resin vat, the funnel, any drips, any tools you used, etc.
- Take out your trash. If you keep any used filters, paper towels, gloves, etc, in a clear plastic bin, you can then leave it outside for a while to convert leftover liquid resin to solid, which you can then toss in the trash.
Longer Term Thoughts
The film on the bottom of the resin tank (the "FEP") needs replacing from time to time. If you clean it well between prints and are careful with what you print, it will last longer. If it looks cloudy or scratched, consider swapping it out with a replacement. Amazon sells the FEP for my printer and probably yours too!
You will want to clean/filter your washing solvent occasionally. You can leave it out in the sun or let it sit in the cure station to harden any liquid resin. Then you can filter out any solid resin particles and reuse it.
There are other accessories that can help make the process easier as well. For instance, a spring steel build plate makes it easy to remove prints. Just make sure you re-level your bed after installing something like this!