Last year Penny Arcade launched a Kickstarter campaign to fund a season of their D&D actual play - Acquisitions Incorporated! My co-conspirator EBongo is a huge Penny Arcade and AcqInc fan, so he backed the campaign at the very highest tier, which granted him an exclusive backer reward - a D&D session with Jerry Holkins! He invited me to join him in Seattle at PA HQ! I decided that - in order to properly celebrate 15 years of Acquisitions Incorporated - I would create some "treasures" to bring along and share with our gracious hosts. I used all my engineering, 3d design, and electronics skills to create some unique stuff, and I want to share what I did and what I learned with you as well!
First off, I needed some inspiration. For the 15th anniversary, a new "AcqInc 15th" logo was commissioned. According to Jerry, long-time PA collaborator Kris Straub was responsible for the design. It seemed like the logical sort of thing base designs around in the context of celebrating AcqInc's 15th.
One of AcqInc's longest running audience participation elements is the "Green Flame" - this began many years ago while Chris Perkins was DM and continues within the game today. If you've never seen the show, I'll explain - often the players encounter some sort of magical effect. The DM will then describe the magic as emitting a "green flame" - which is the audience's cue to shout "GREEN FLAME" at the players.
A Trio of Trinkets
I wasn't exactly sure how long I had to work between when EB gave me the invite and when the trip was going to take place. Organizing the trip meant aligning many schedules, including ours, Jerry's, and our "Special Guests" at the table. I decided to start with some simple ideas and see what I could come up with on a short timetable.
Trinket 1: 15th Anniversary Magnet
I started with the "15th" logo and decided to make two different "trinkets" from it. The first is a "captive magnet" design. I've done this a few times over the years, and I think they're super cool. I took the logo from PNG format and traced it to SVG. Then I took that 2D SVG into Fusion 360 and extruded it into a 3d object. I added some depth to the various elements of the logo to make it "pop" a bit, and then carved out a hole for the magnet.
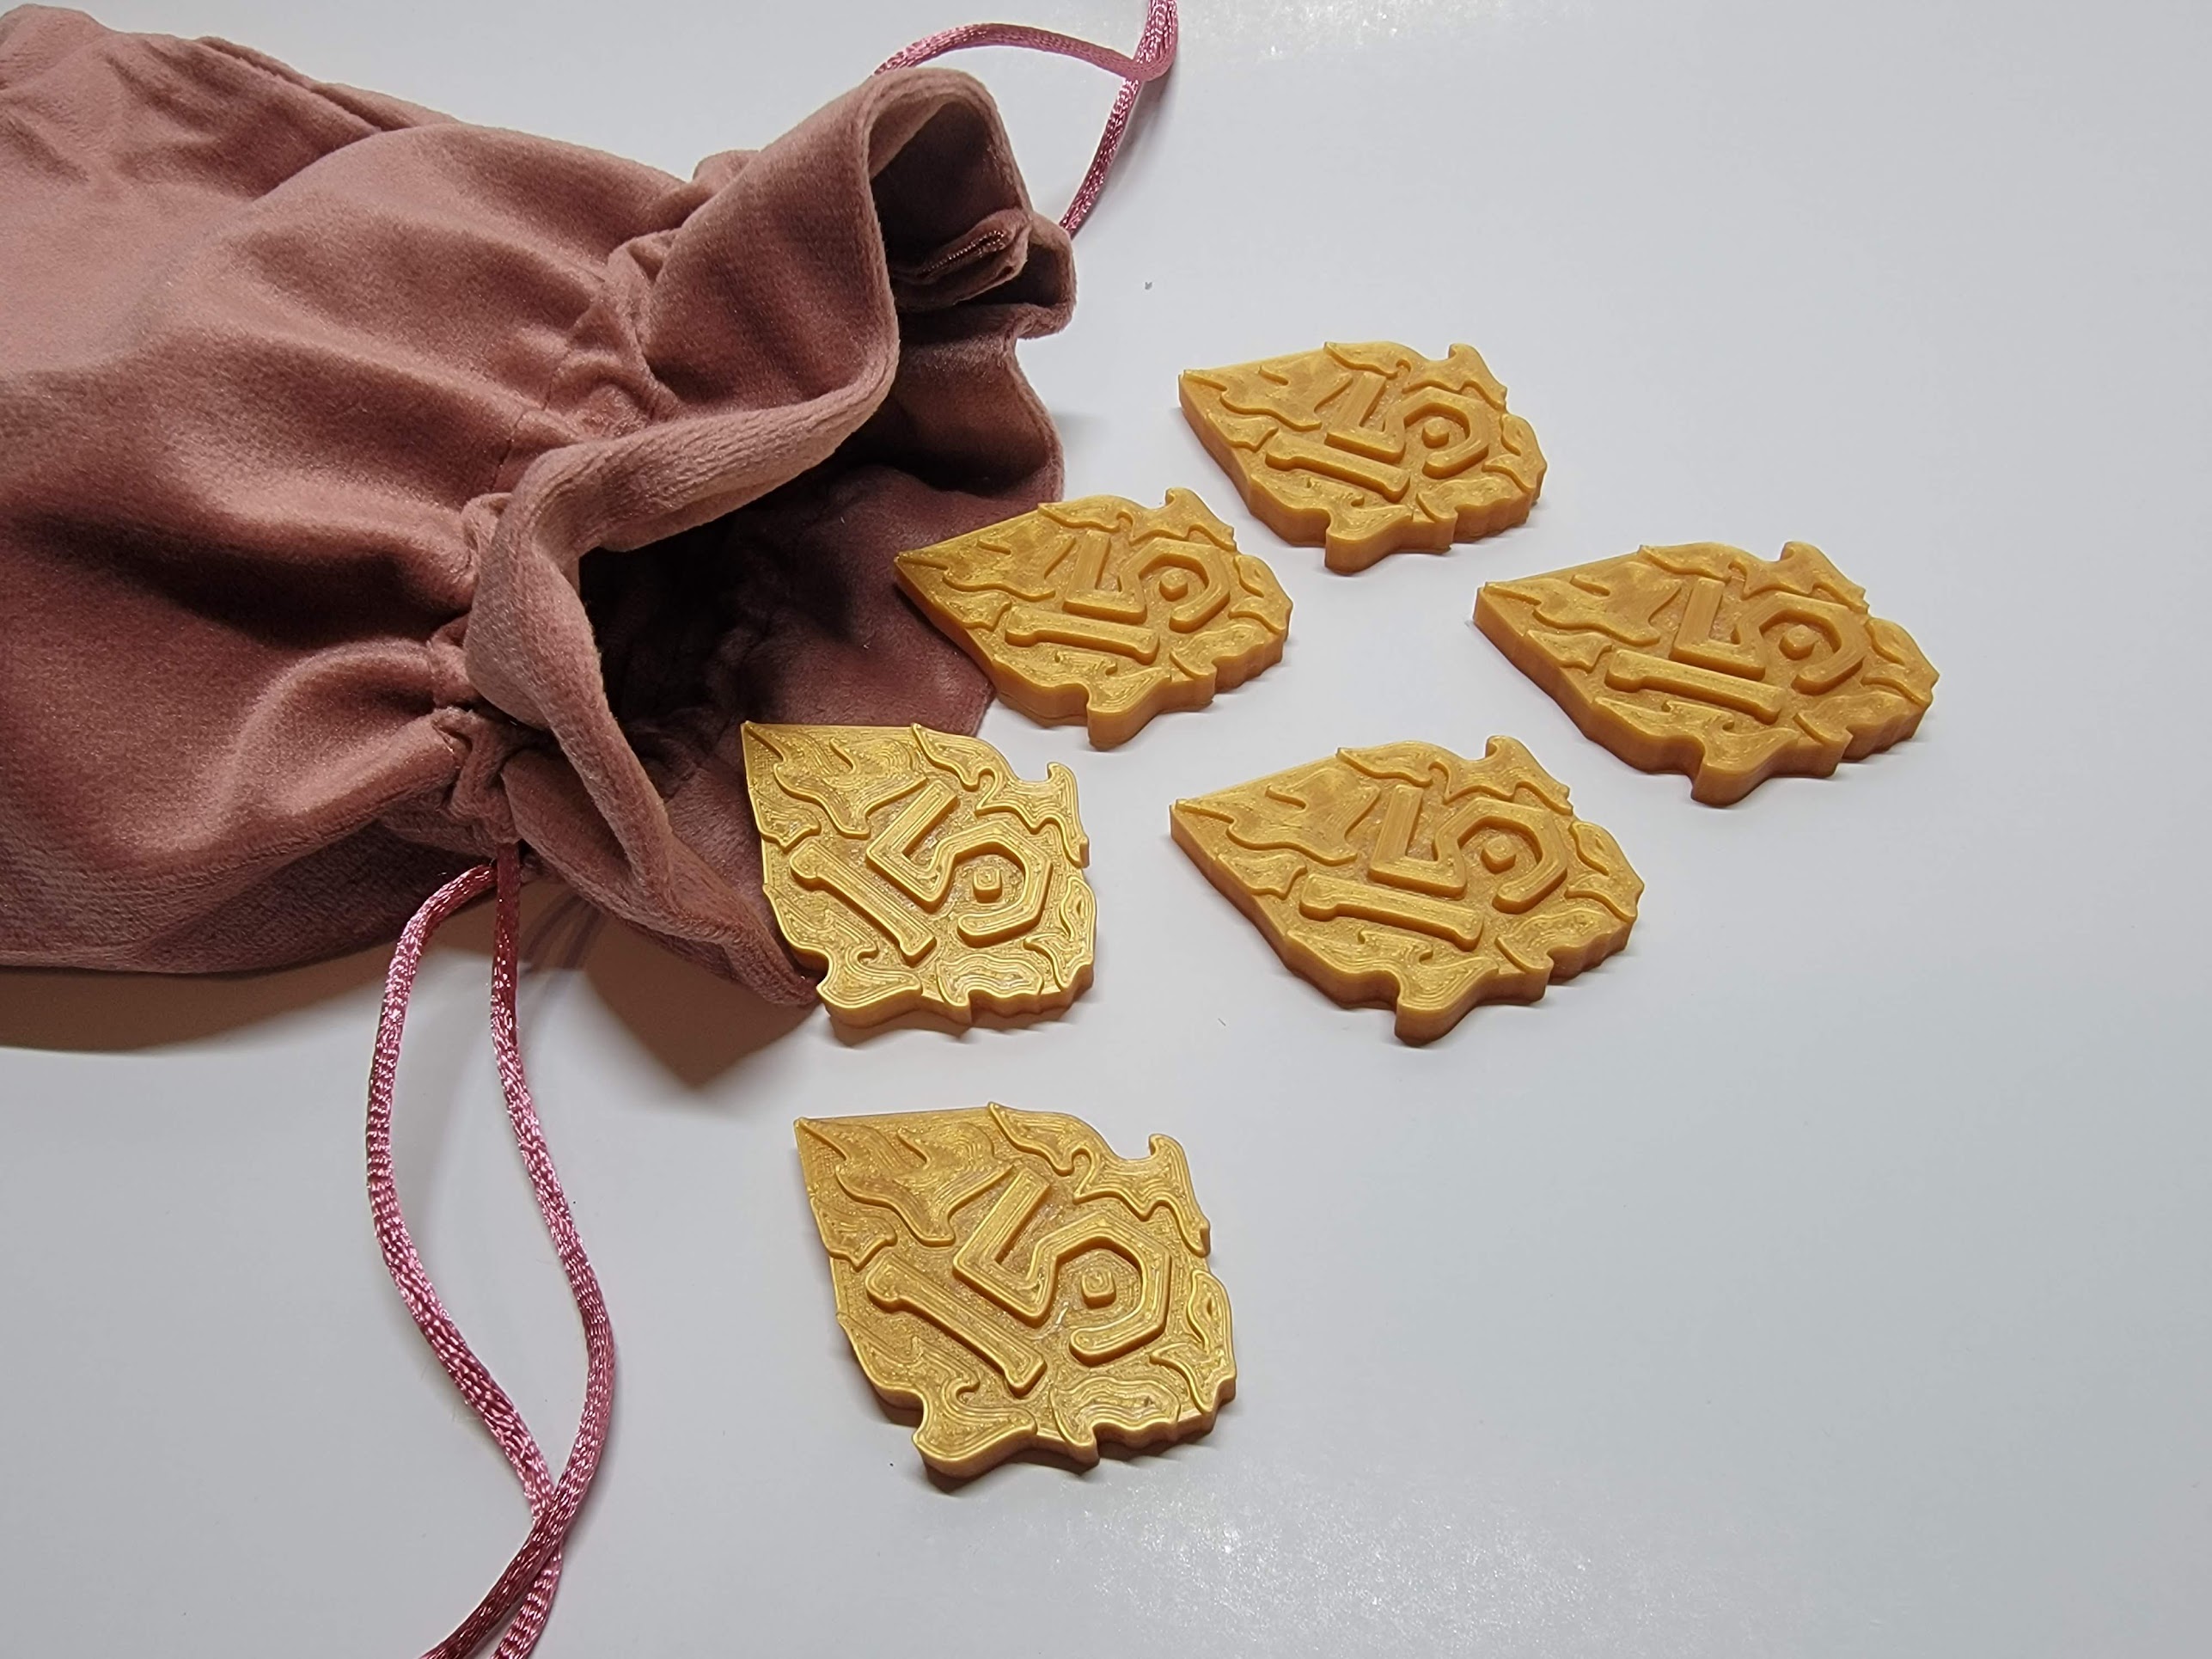
During printing, I instructed the printer to pause right as it was about to close the hole in the design, and I dropped a magnet in. The printer then continues, closing the hole over the magnet. For this print, I used Atomic Filament's "True Gold". It's somewhat matte and reflective, and I think the overall finished product looks pretty great.
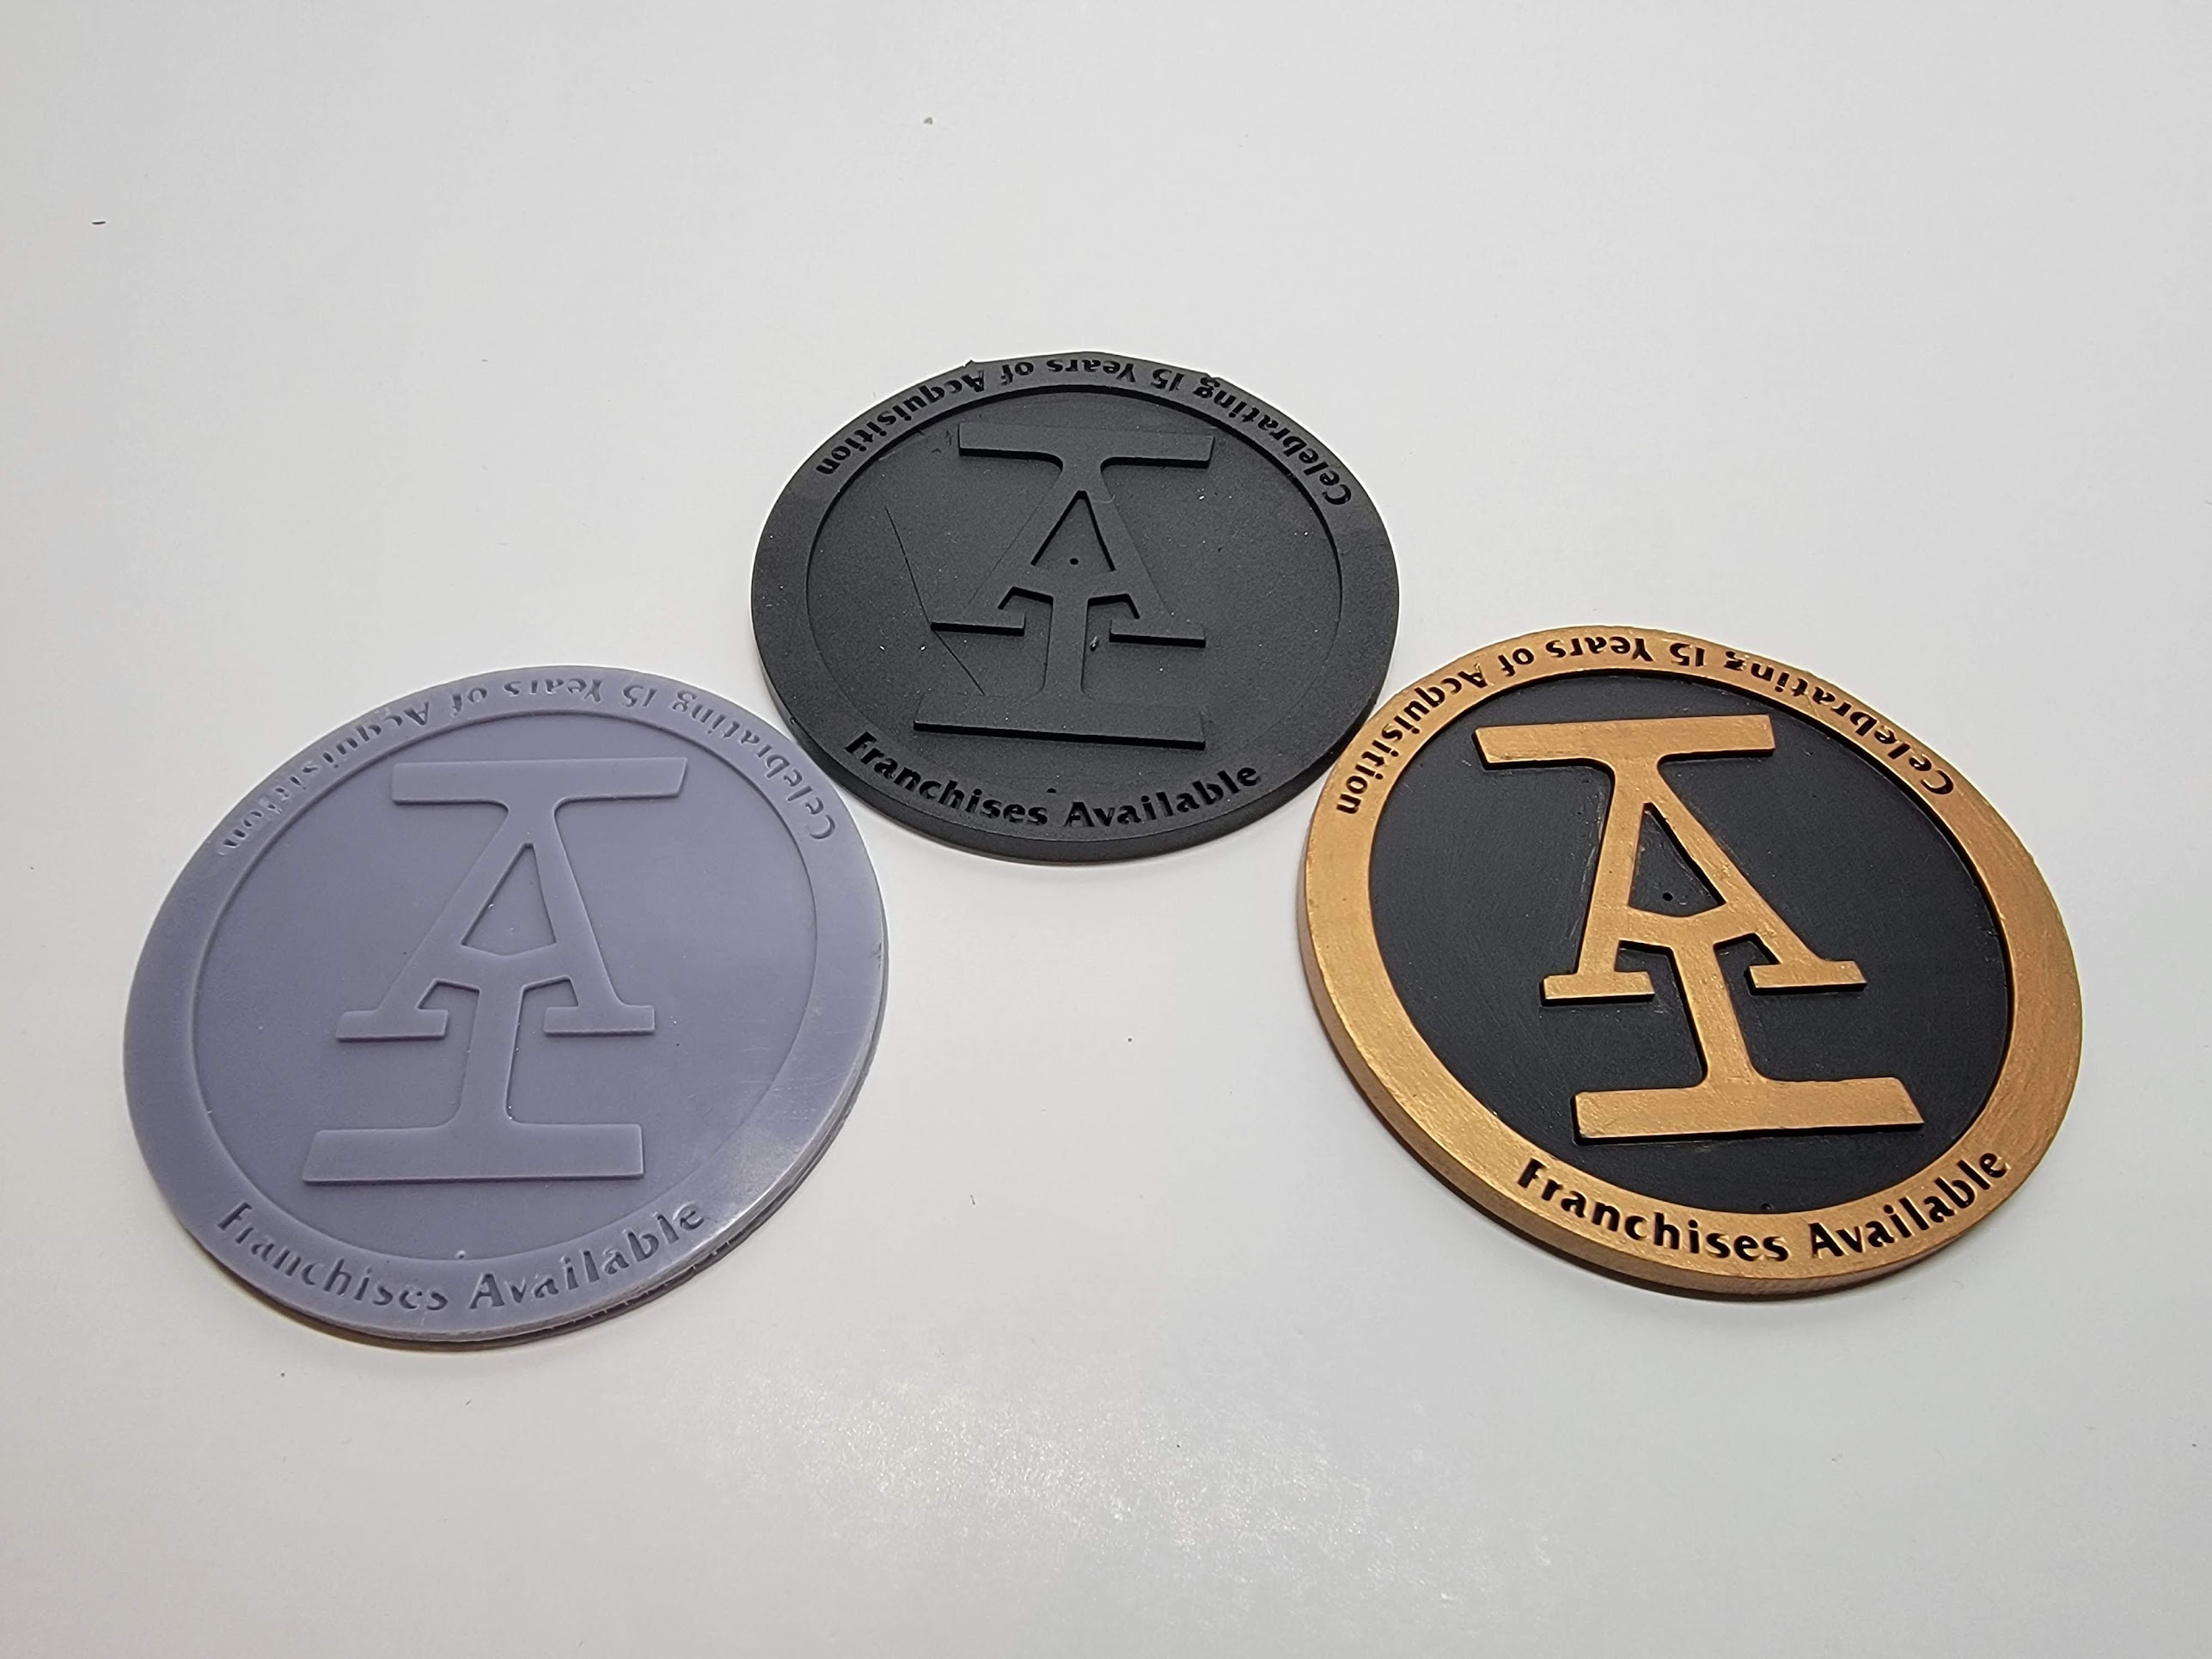
Trinket 2: Dual-Logo Keychain
For my second trinket I went with a keychain. They're pretty easy to build, they're small and easy to pack, and most people can find a use for one! For this one, I wanted to do a little bit more than just extrude the logo. I experimented with a number of designs that incorporated both the "traditional" AcqInc logo and the "15th" logo together, and finally settled on a version where they're kind of extruded/melted into each other, forming a single object.
![]()
For this print, I really wanted to lean into "Green Flame" - and I saw that Atomic had a UV-reactive translucent green filament. I bought a roll and did a few test prints, and I was really impressed with how bright they glow under a blacklight!
![]()
Trinket 3: Jim & Omin Coins
With two trinkets down, I decided to take things in a different direction. I've recently gotten into resin printing in addition to filament printing. I came up with the idea to use some of Kris' other AcqInc art to create a commemorative coin. I had a few false starts and a few misprints, but finally was able to produce a couple dozen "Jim and Omin" themed coins.
The resin I have comes out a sort of "unpainted mini gray." I thought "how hard can it be to make these look metallic?" Turns out, pretty dang hard. I started with a black spray primer as the base layer. I opted for a "bronze" look, so I hand-painted bronze highlights on the coins. The metallic paints don't really seem to cover well, though, and overall I was pretty unhappy with how they were looking. I ended up doing a few layers of white in the highlight areas, and then switching to metallic on top. I'm still somewhat of a neophyte when it comes to painting my prints, so this took... a while.
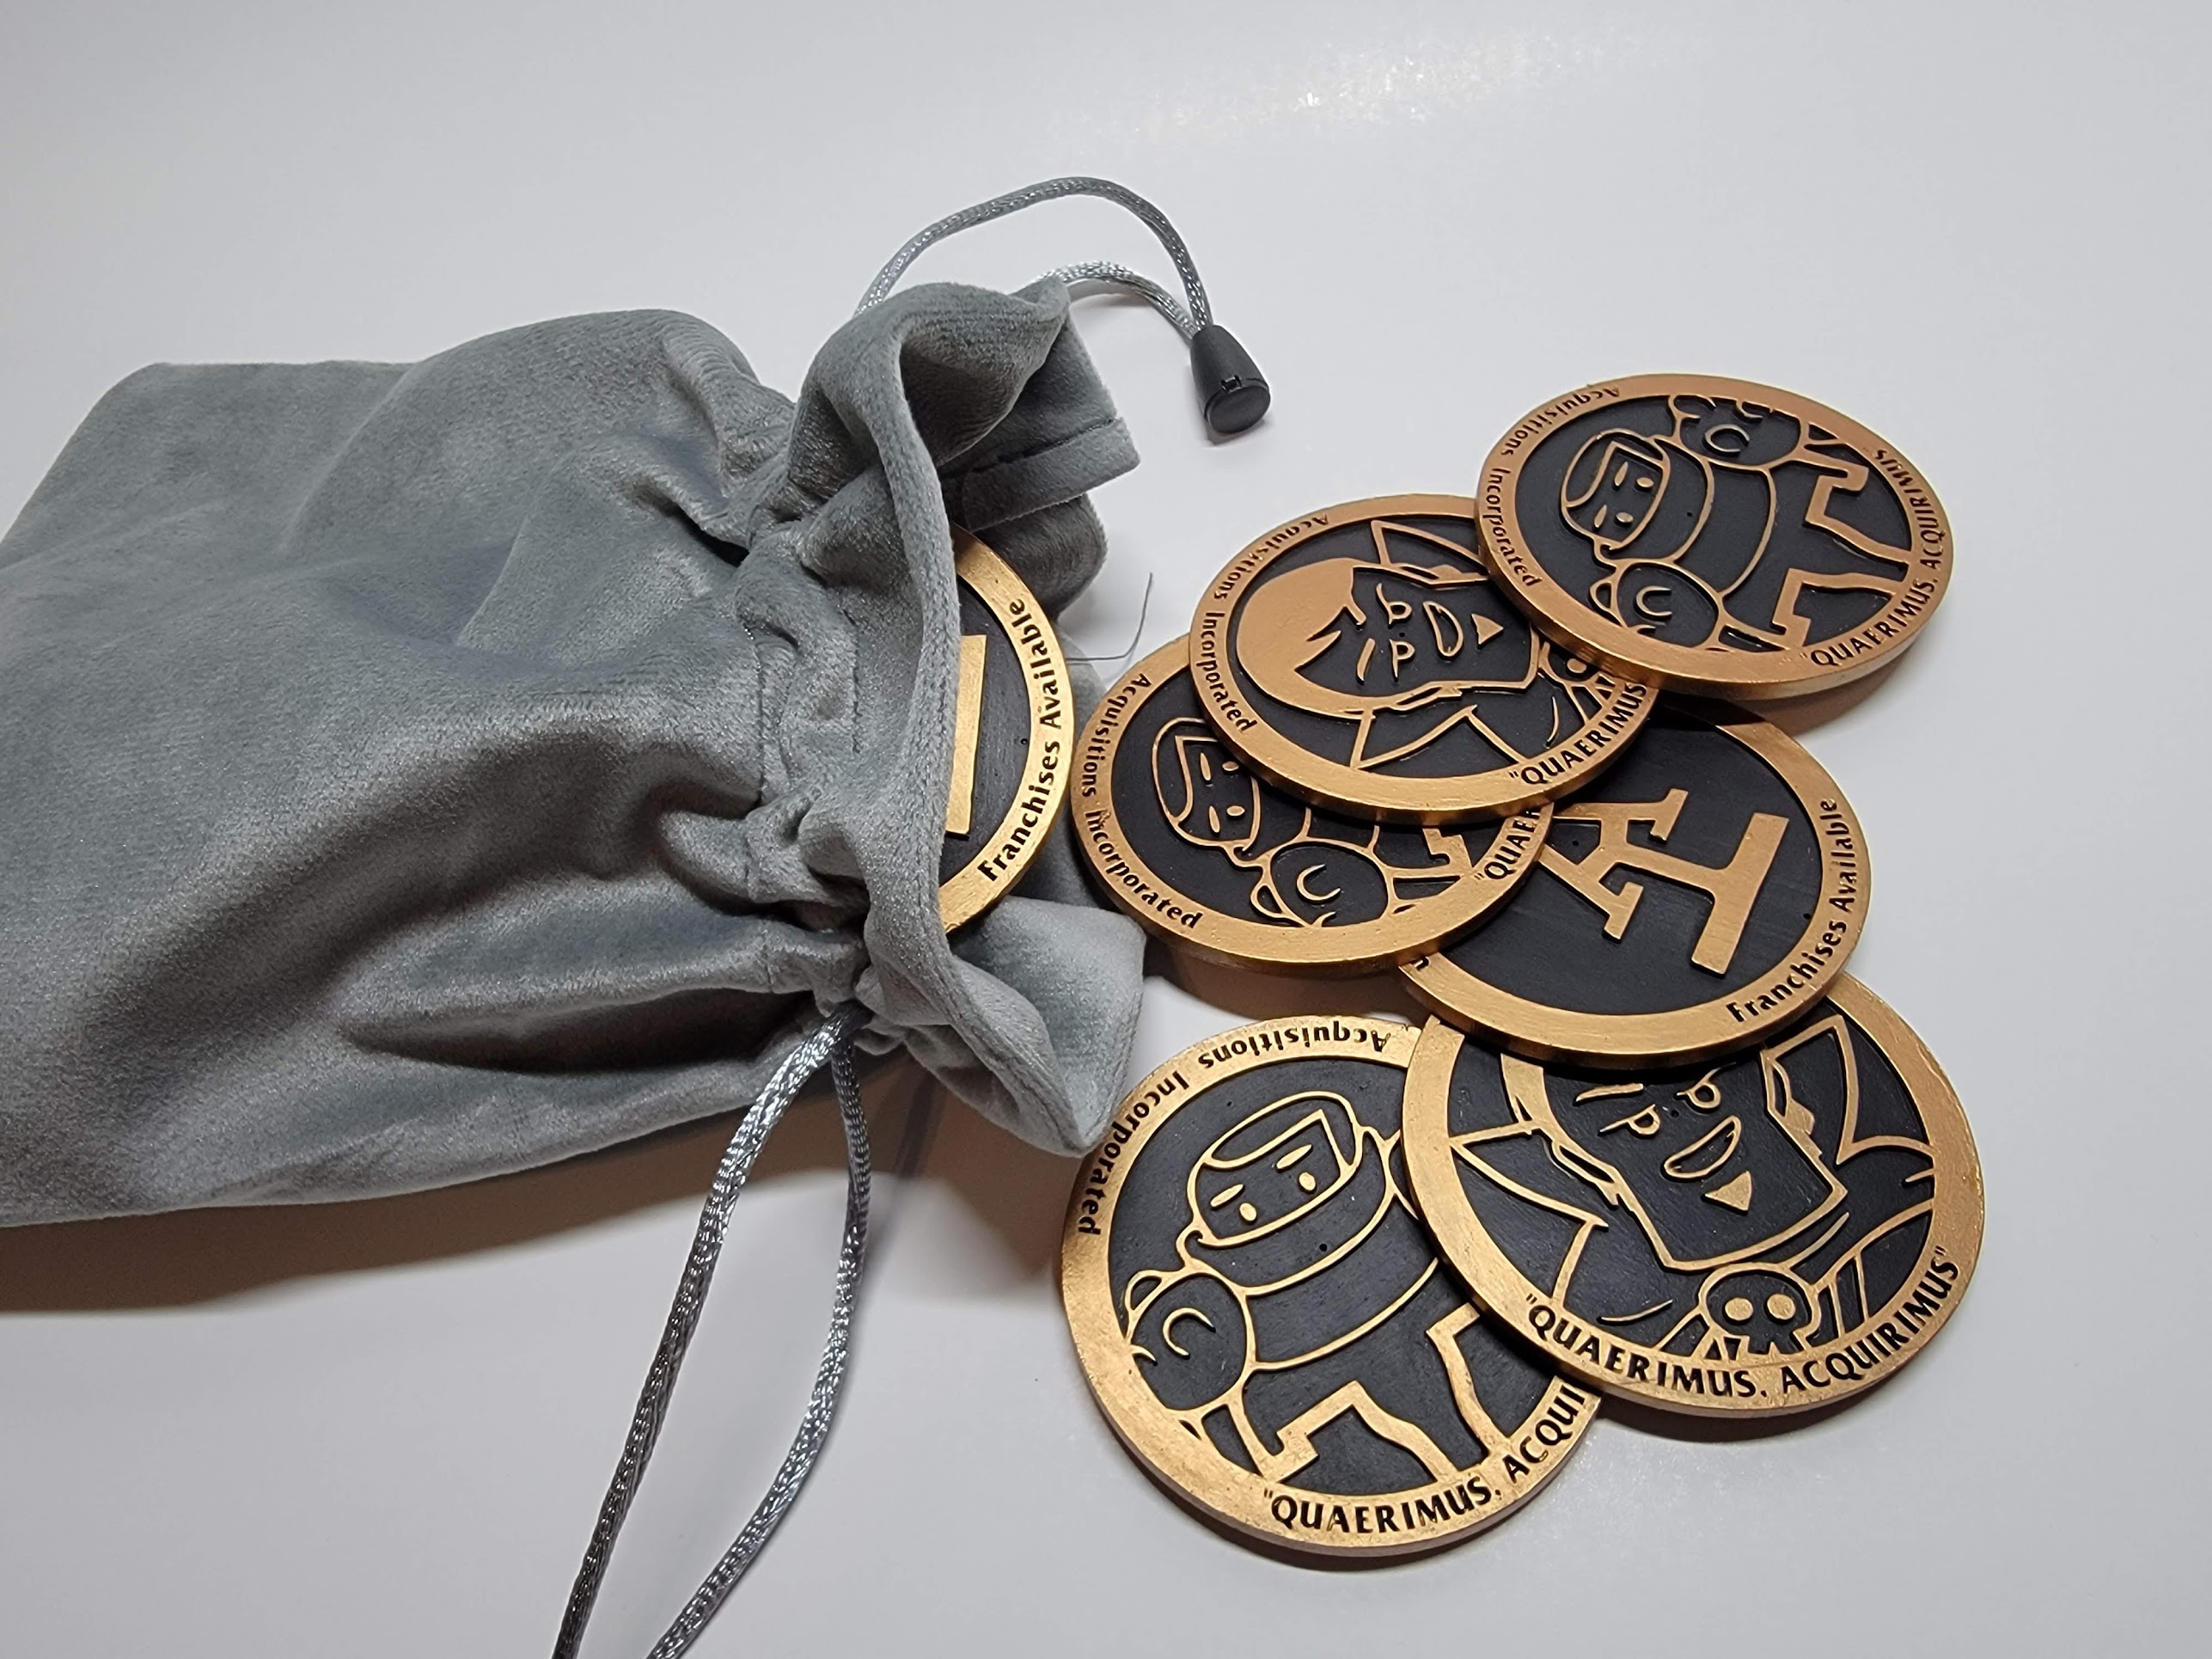
Finally, I tried various top coats to see if I could give them a little bit of scratch resistance. I settled on acrylic matte varnish, which I thought looked the best of the options I tried.
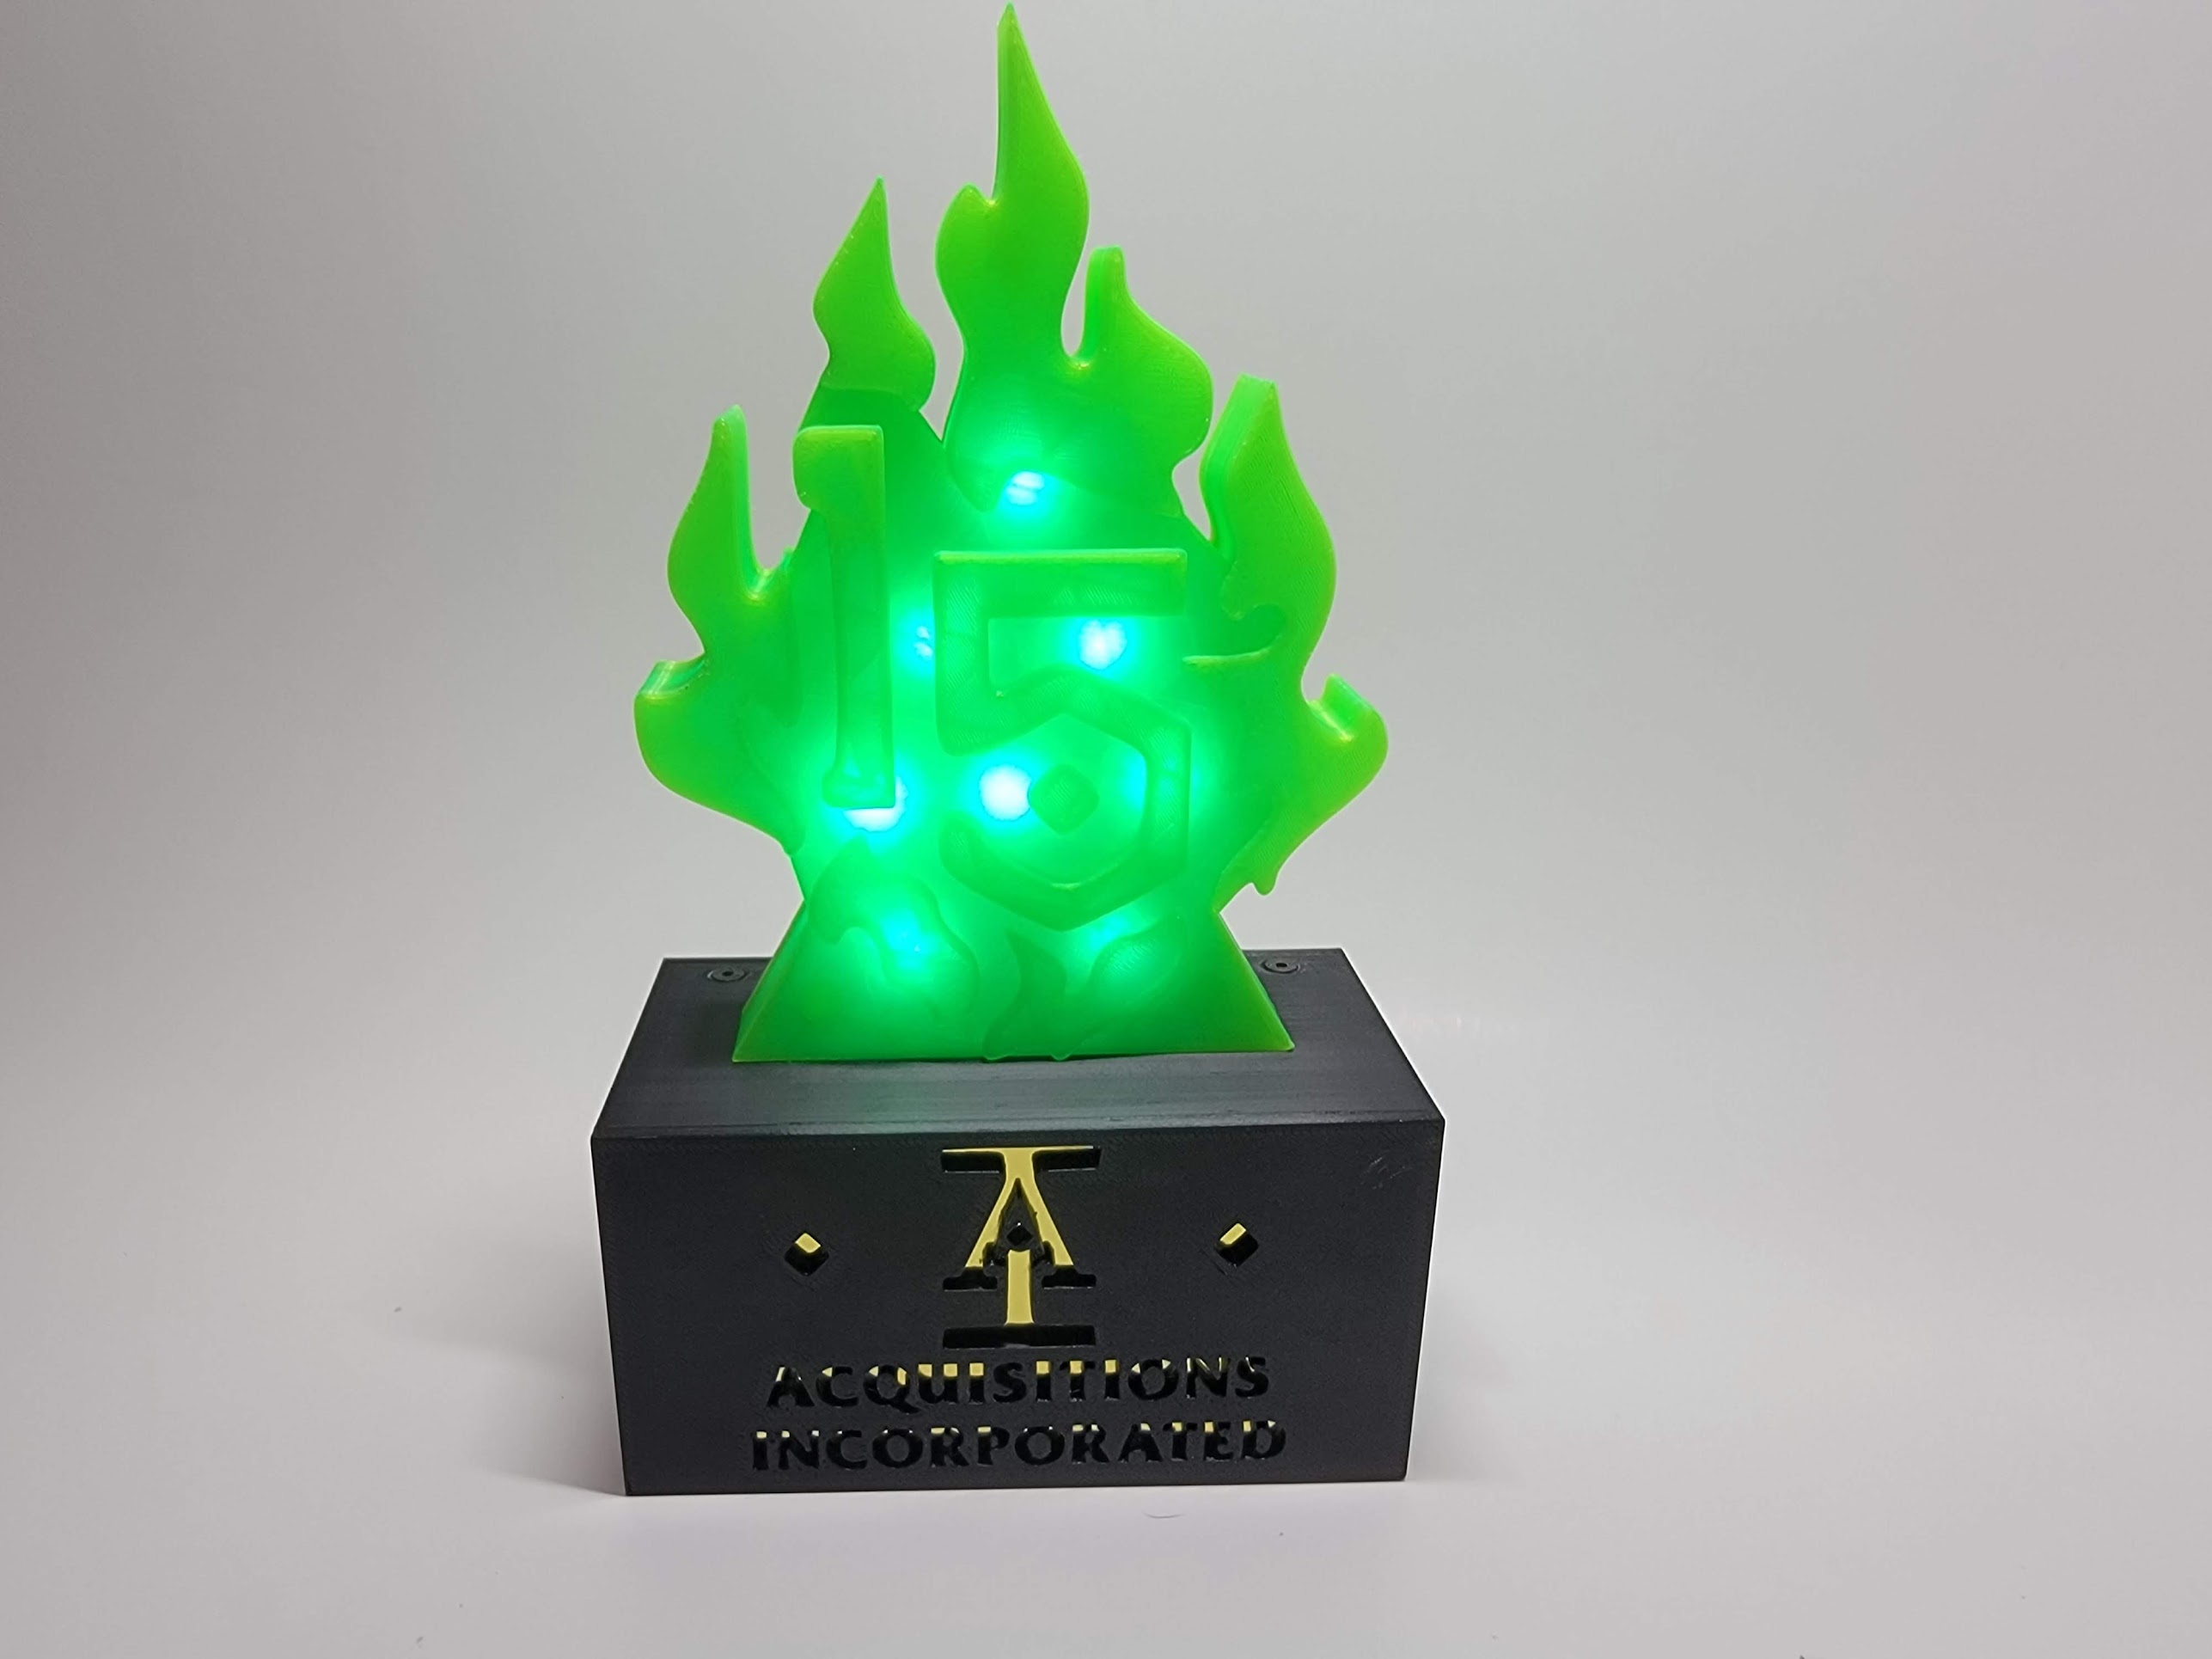
The Statue
I could have stopped there. But... a madness gripped me. I had an idea. After playing with the UV reactive filament, I thought "this is cool, but needing a UV flashlight to really see it glow is a pain." What if I could embed the light? Yeah! I can totally wire up some UV LEDs and make them glow from inside the Green Flame! And thus, the Statue was born.
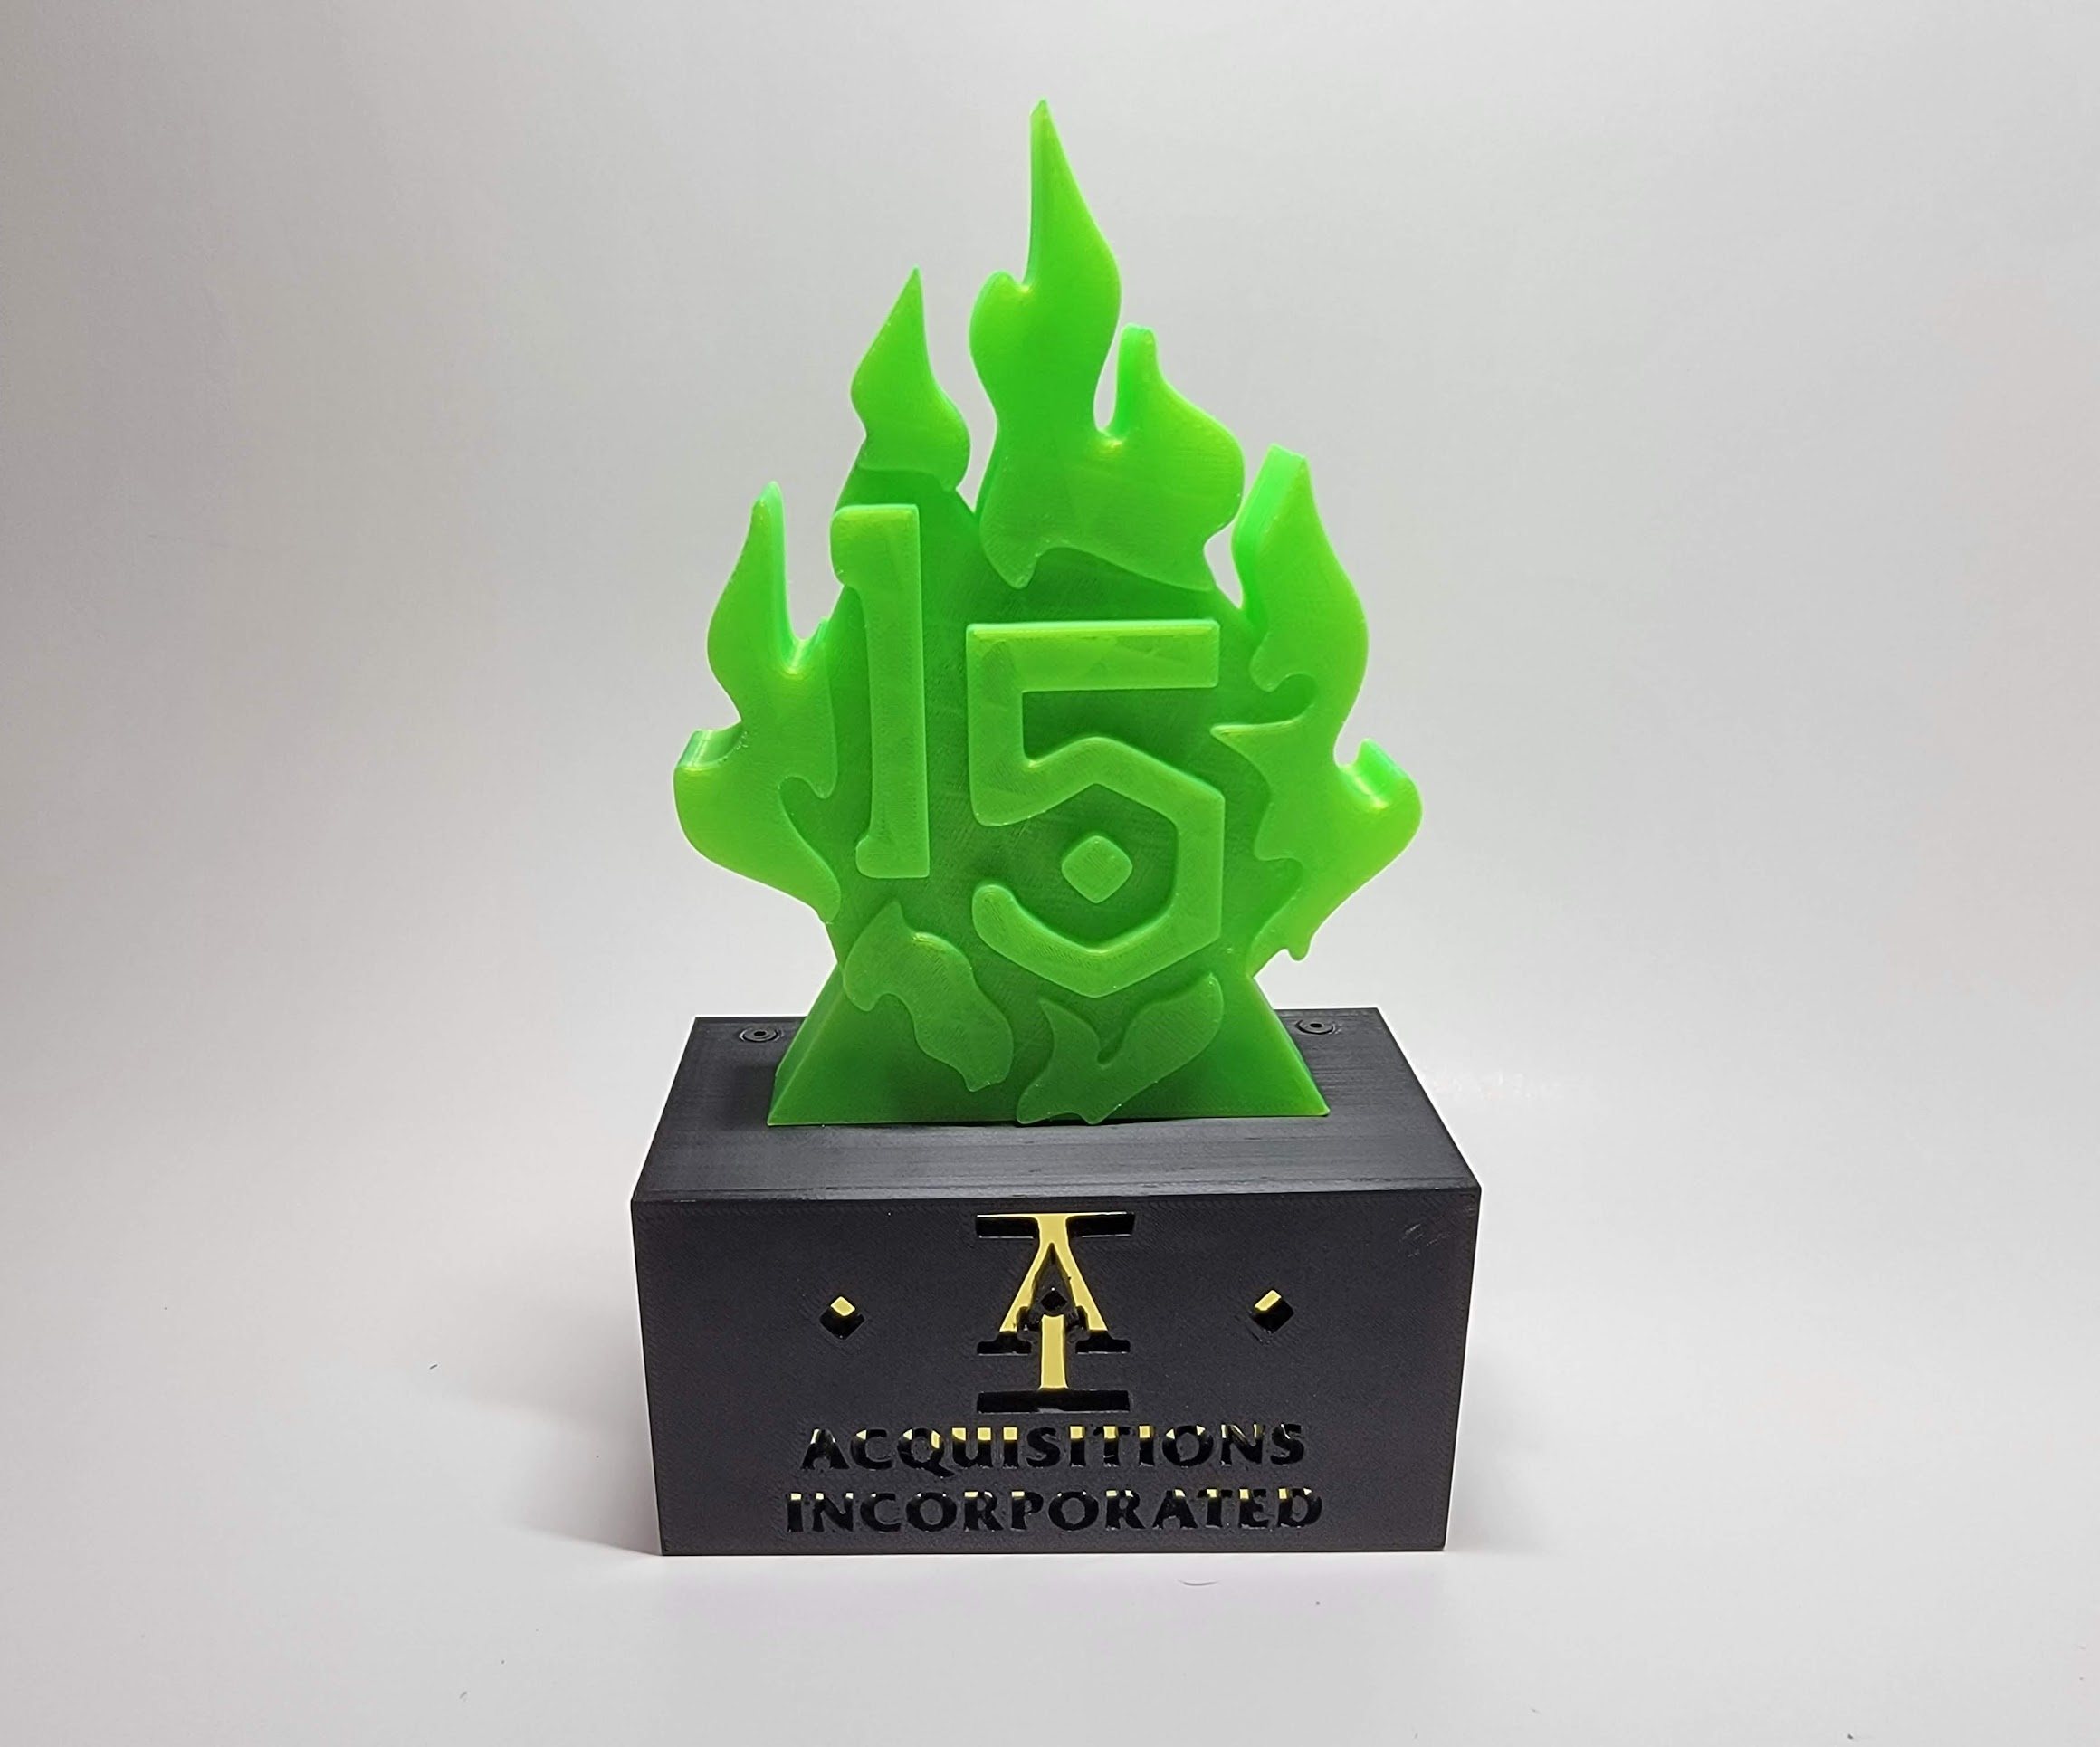
I went through several iterations of The Statue before I settled on the final design. The "base" is black, with lettering and logos as voids that go all the way through. I put some reflective gold paper on the inside, so that the lettering looks gold. This base is where all the electronics live. Wires run from the inside of the base into the flame, where an array of LEDs lives.
I went through multiple iterations on lighting, as well. I kept trying to find LEDs that were bright enough to give the Flame a "WOW" factor. (These folks get all kinds of fan art and stuff, after all - gotta stand out!) I wanted to turn this thing on and be almost hard to look at. It took several different packs of LEDs from different vendors before I settled on a surface-mount UV LED that is rated for something like 3 watts. It's overkill, because there's no way I could push that amount of current without melting the plastic. Plus, the plan is USB power, and there's a limit there as well. In the end, the LEDs are substantially underdriven, but even underdriven they were far brighter at the same input current than anything else I could find.
So yeah, why not stick 8 of them in there? Max output of 24W of UV in a statue about a foot tall sounds totally reasonable, right? Yessssssss.
In looking for the electronics to handle driving the LEDs and so that I could program them, I considered a large number of different microcontrollers. I have a real soft spot for Adafruit and their CircuitPython platform. Looking at their lineup, the Adafruit Feather RP2040 caught my eye.
Hmm, it has an interface for a lithium ion battery that charges over USB-C... Okay, sure, this thing will be battery OR wall powered. And the Stemma QT port means I could use an LED driver chip easily. Plus... the Raspberry Pi microcontroller can technically operate as a MP3 player with the right amplifier hardware...
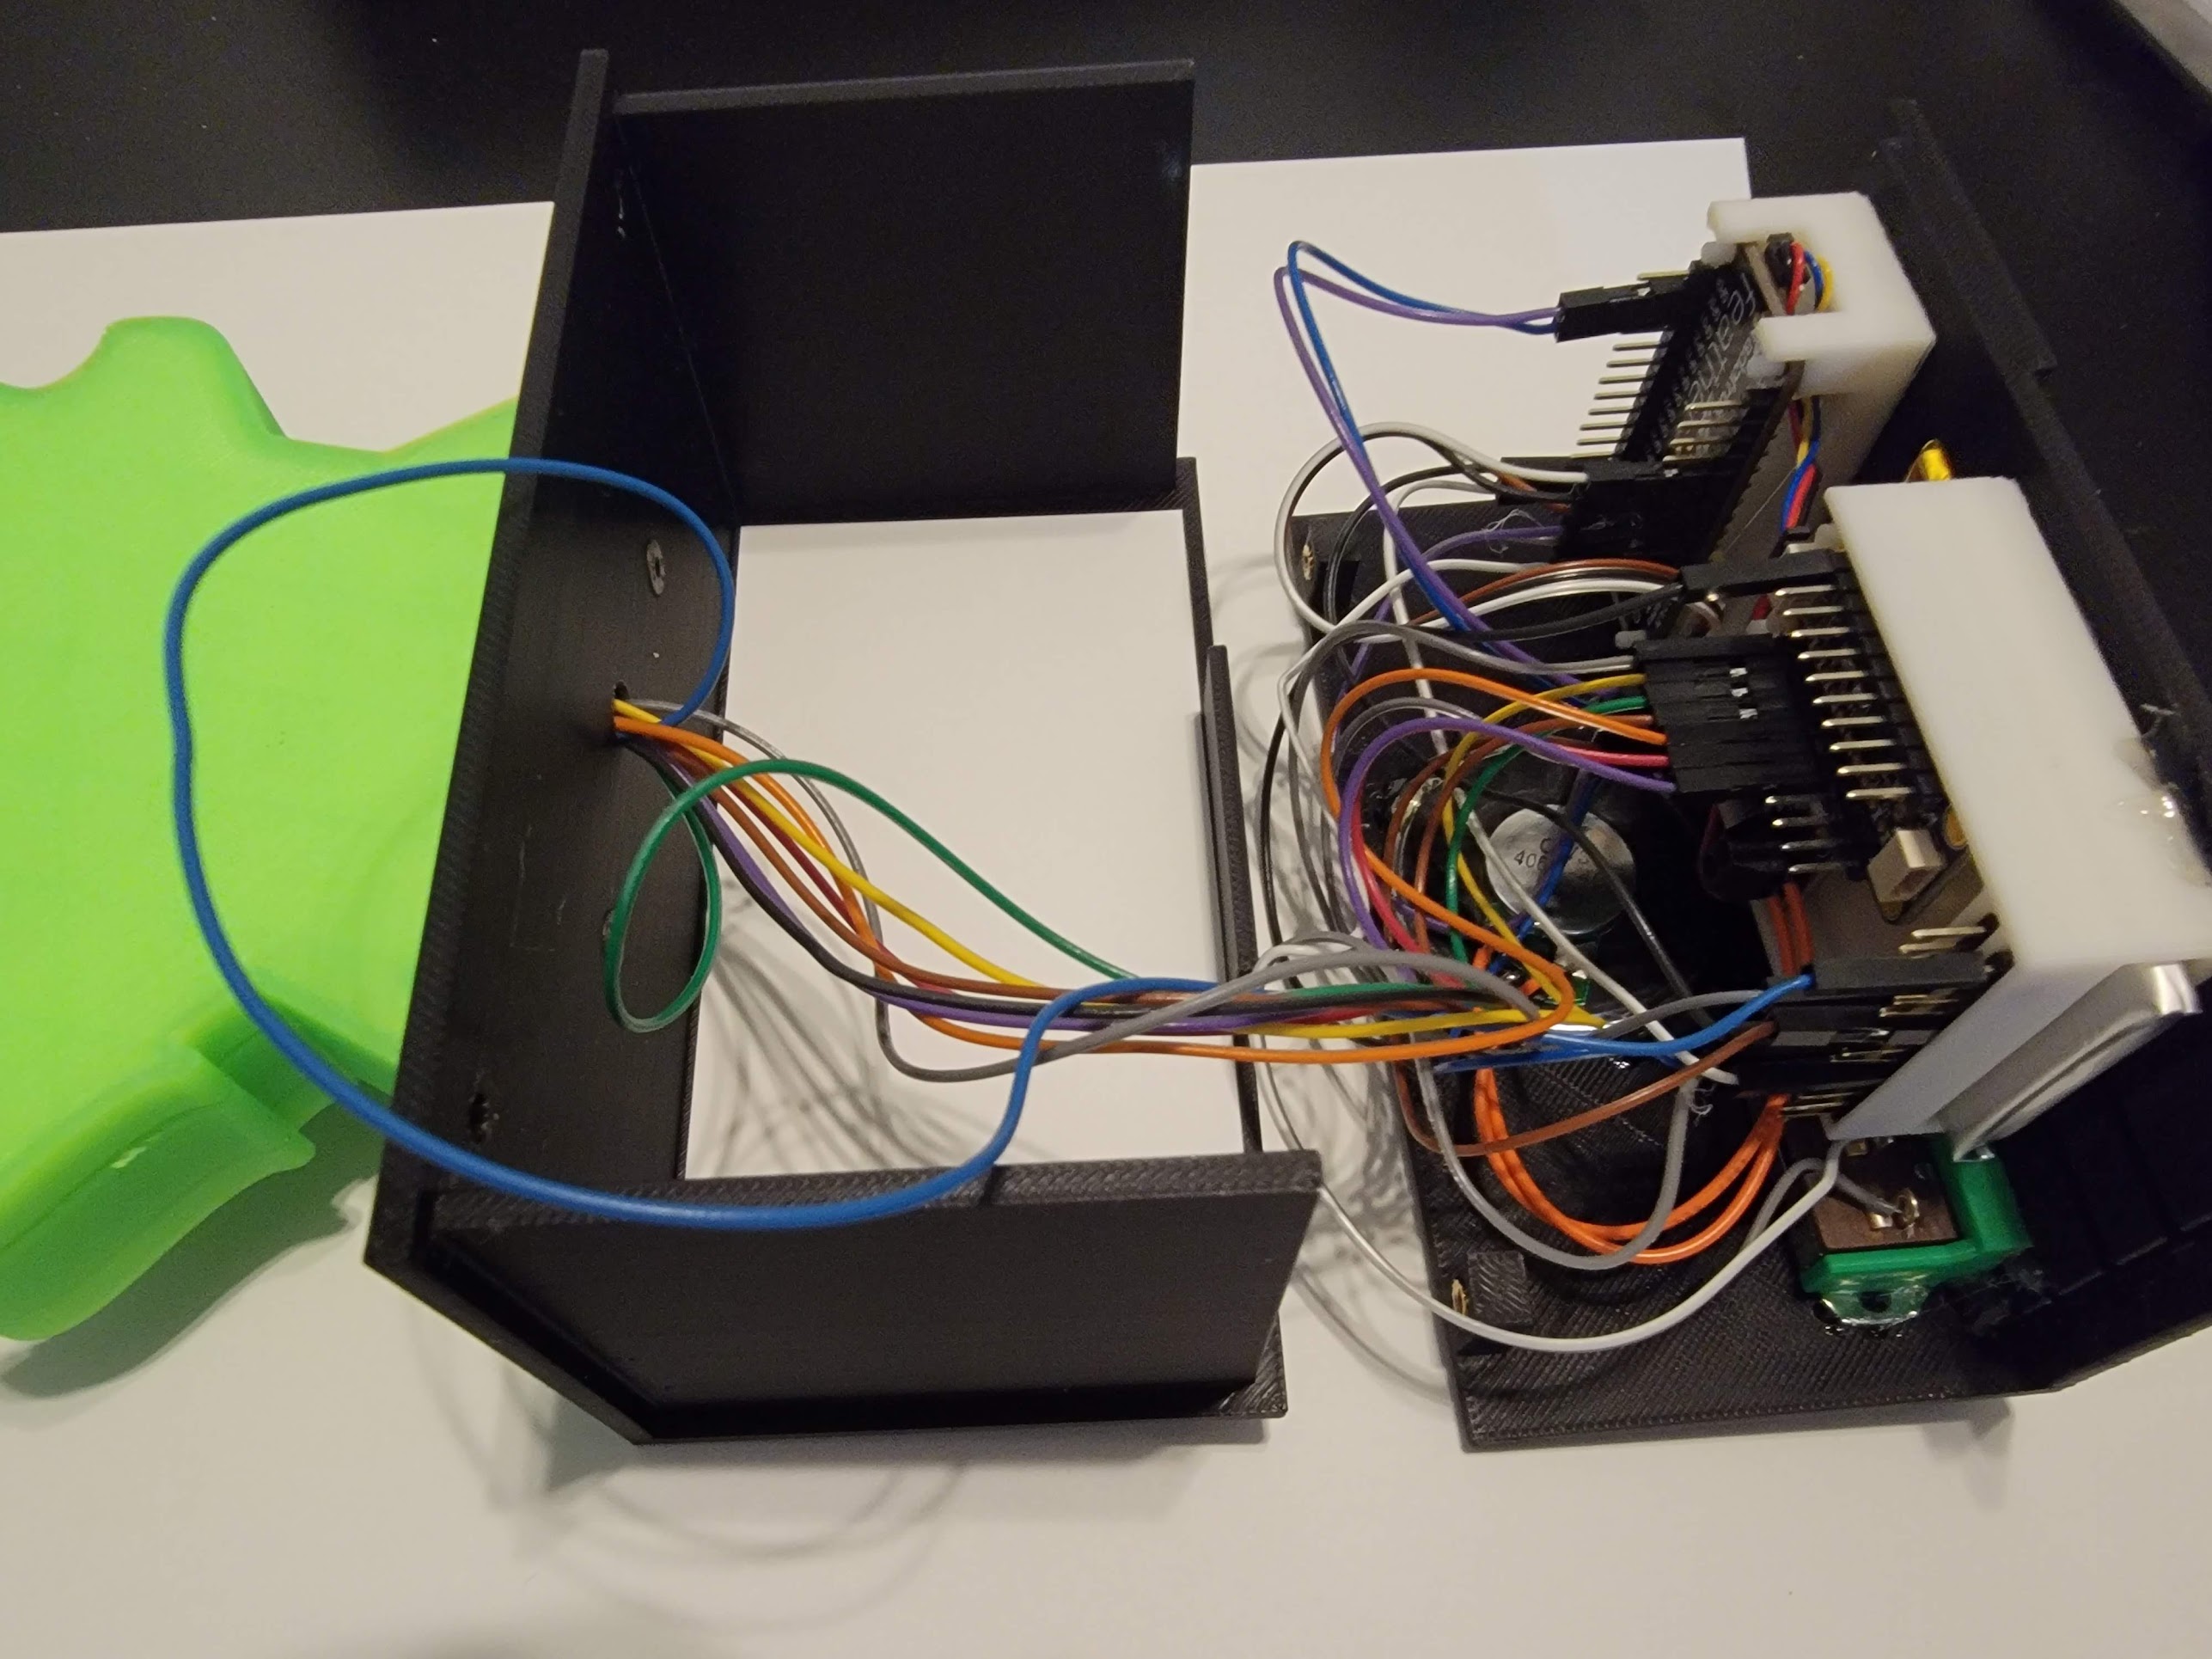
So now this thing is a lights-and-sounds, battery powered monstrosity. Yes! Muahahahahah! Hours of printing and soldering later, it was assembled. Quite possibly the most complex piece of hardware I've ever built!
I put a 5-way rocker switch on the back and programmed the LEDs and MP3 playback to hit the highlights of AcqInc audience participation. When it is turned on, it plays the intro music from the live show. It has a "Green Flame" mode (obviously), plus it does the "Cauldron Tip" from the C-Team, "Blood and Cheese" (Bobby Z's fave), "bwomp-bwomp-bwomp", and then I gave it a sort of "burning flame" effect to top it off. Most of the audio is sampled from VODs of the live game. In some cases, they were games that EB and I attended in person, as an extra "easter egg" to an extent.
But Wait, There's More!
Yeah. I already went too far. I went farther still. I wanted to make the statue a gift for Jerry, for graciously DM'ing the game for us. But we were also going to be playing with Trystan Falcone and Kate Welch. I didn't want them to leave empty handed! Plus, I mean, EB was fronting the (non-trivial wad of) cash for this trip, and I bet he'd like a memento as well.
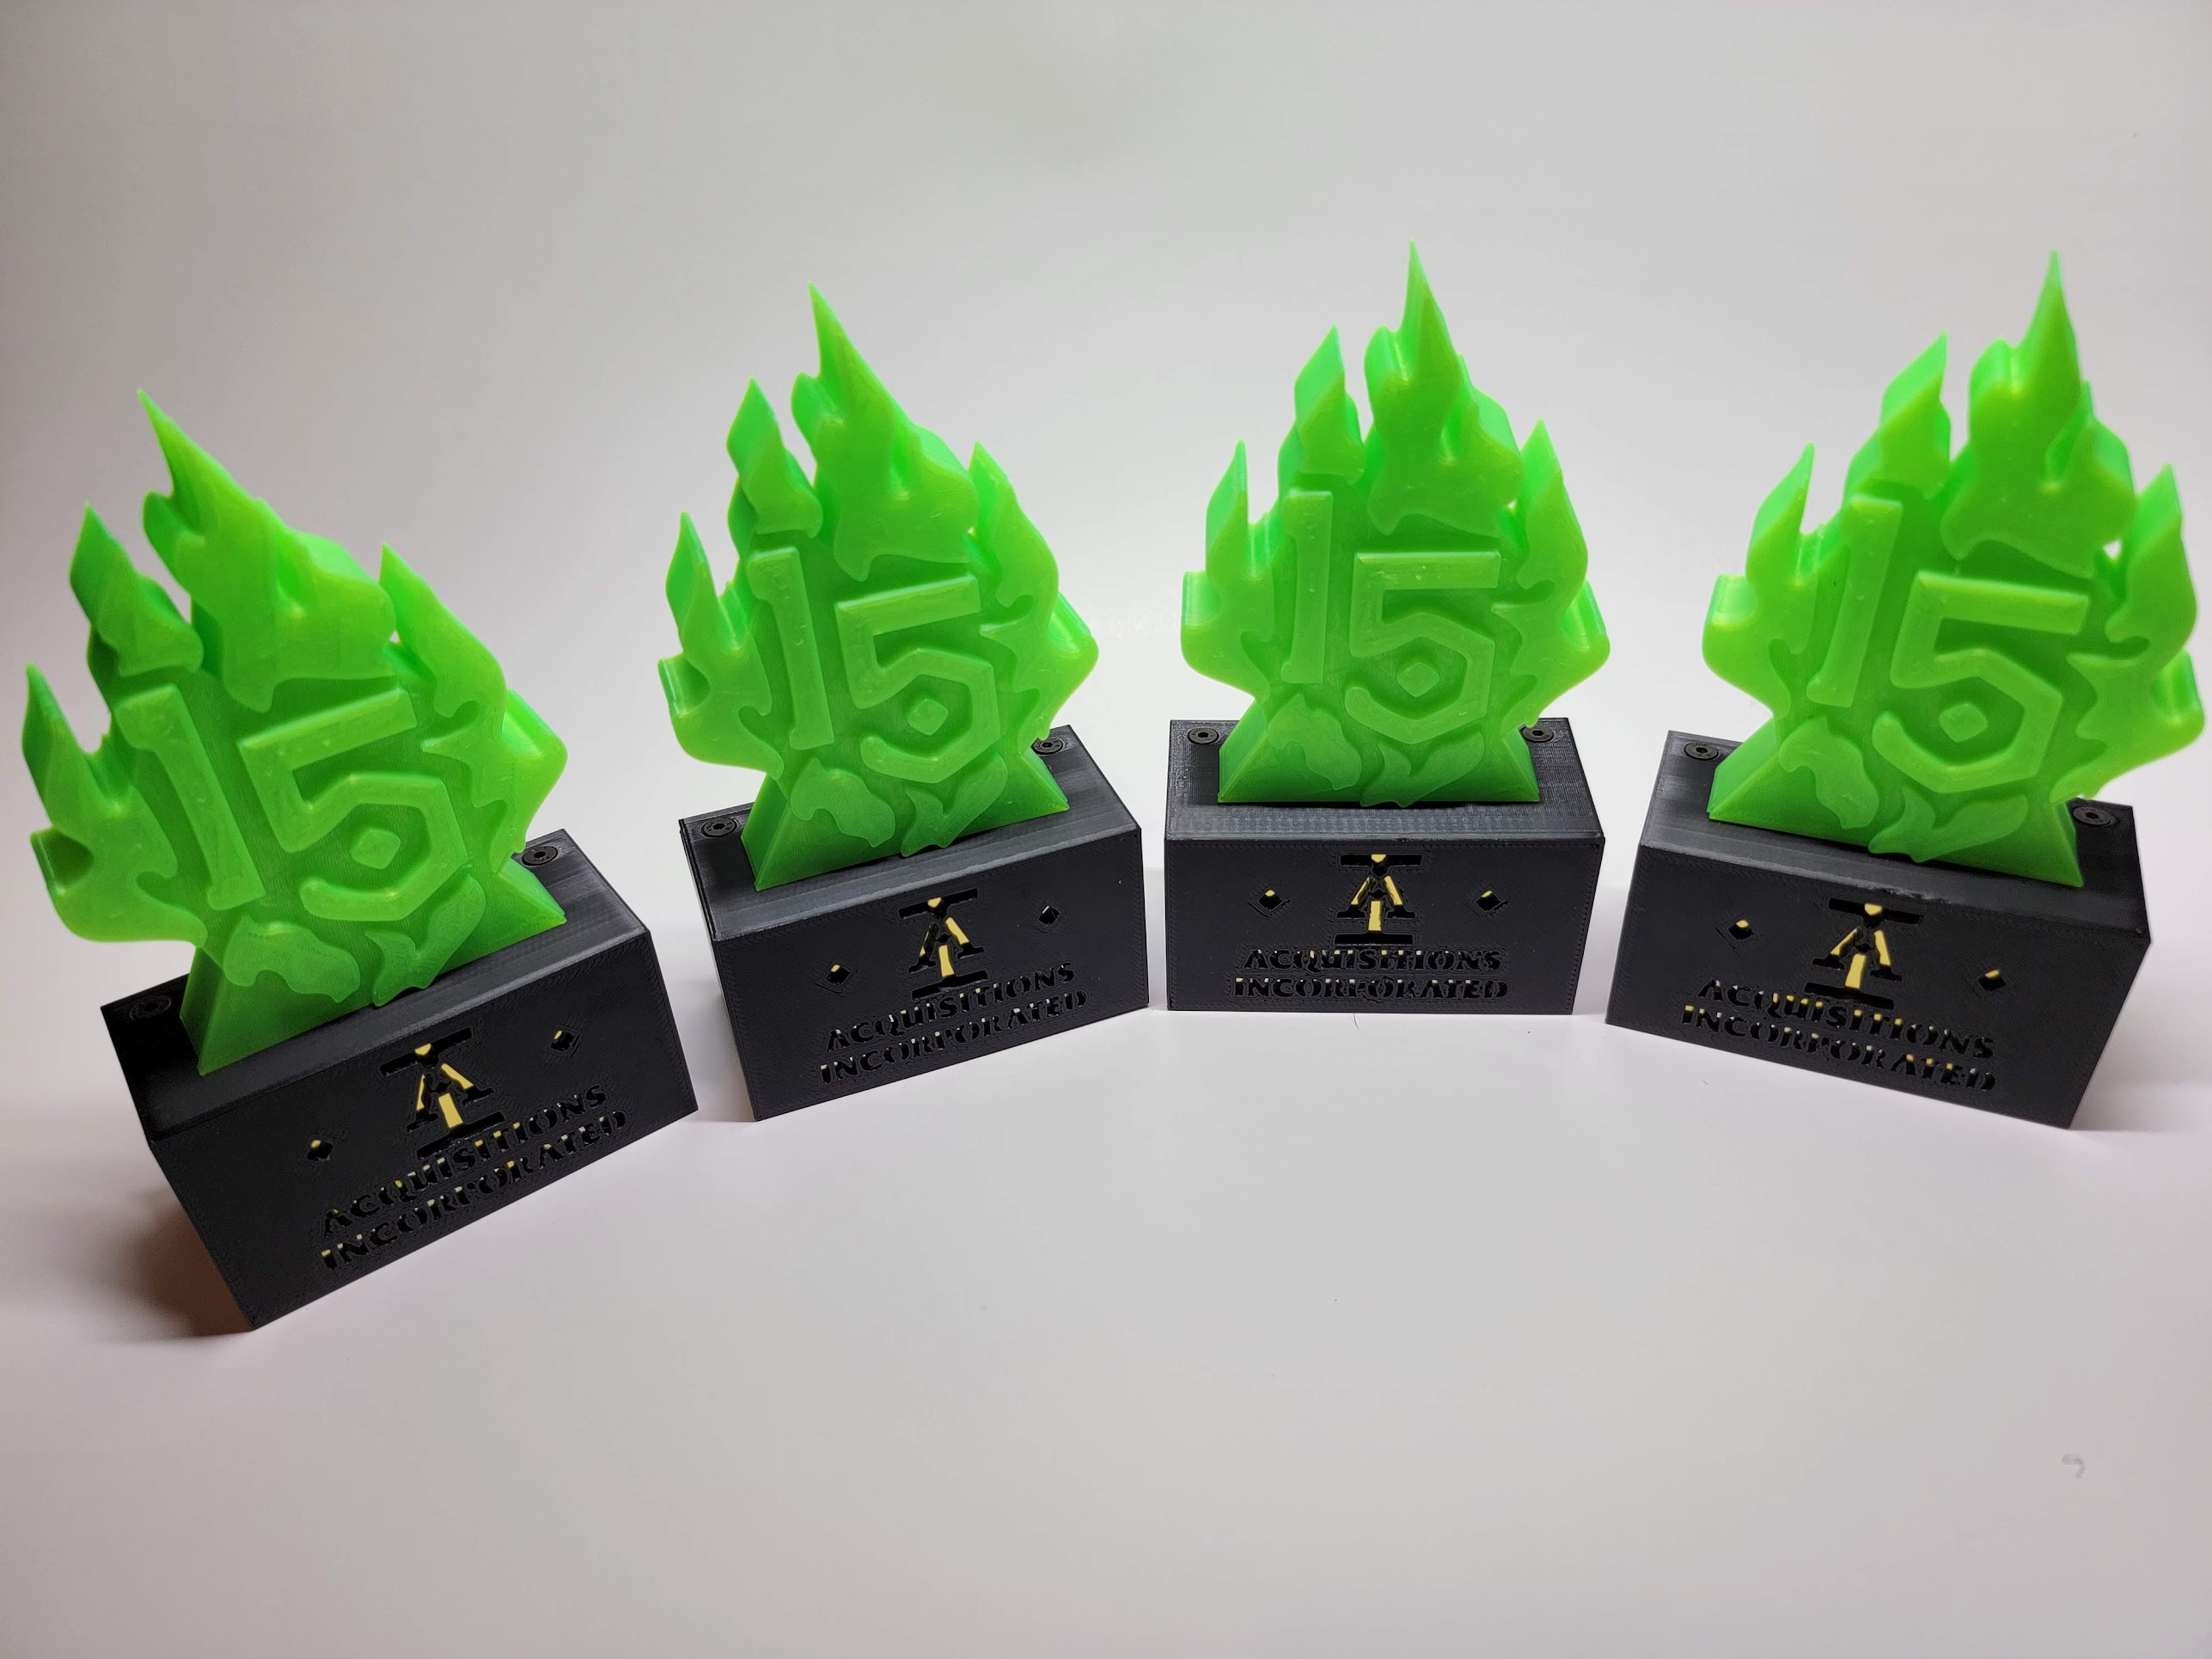
Sooooo I made 4 more statues for us players. Smaller, yes, and just one LED, no battery, no audio. Still, I think they turned out really nice!
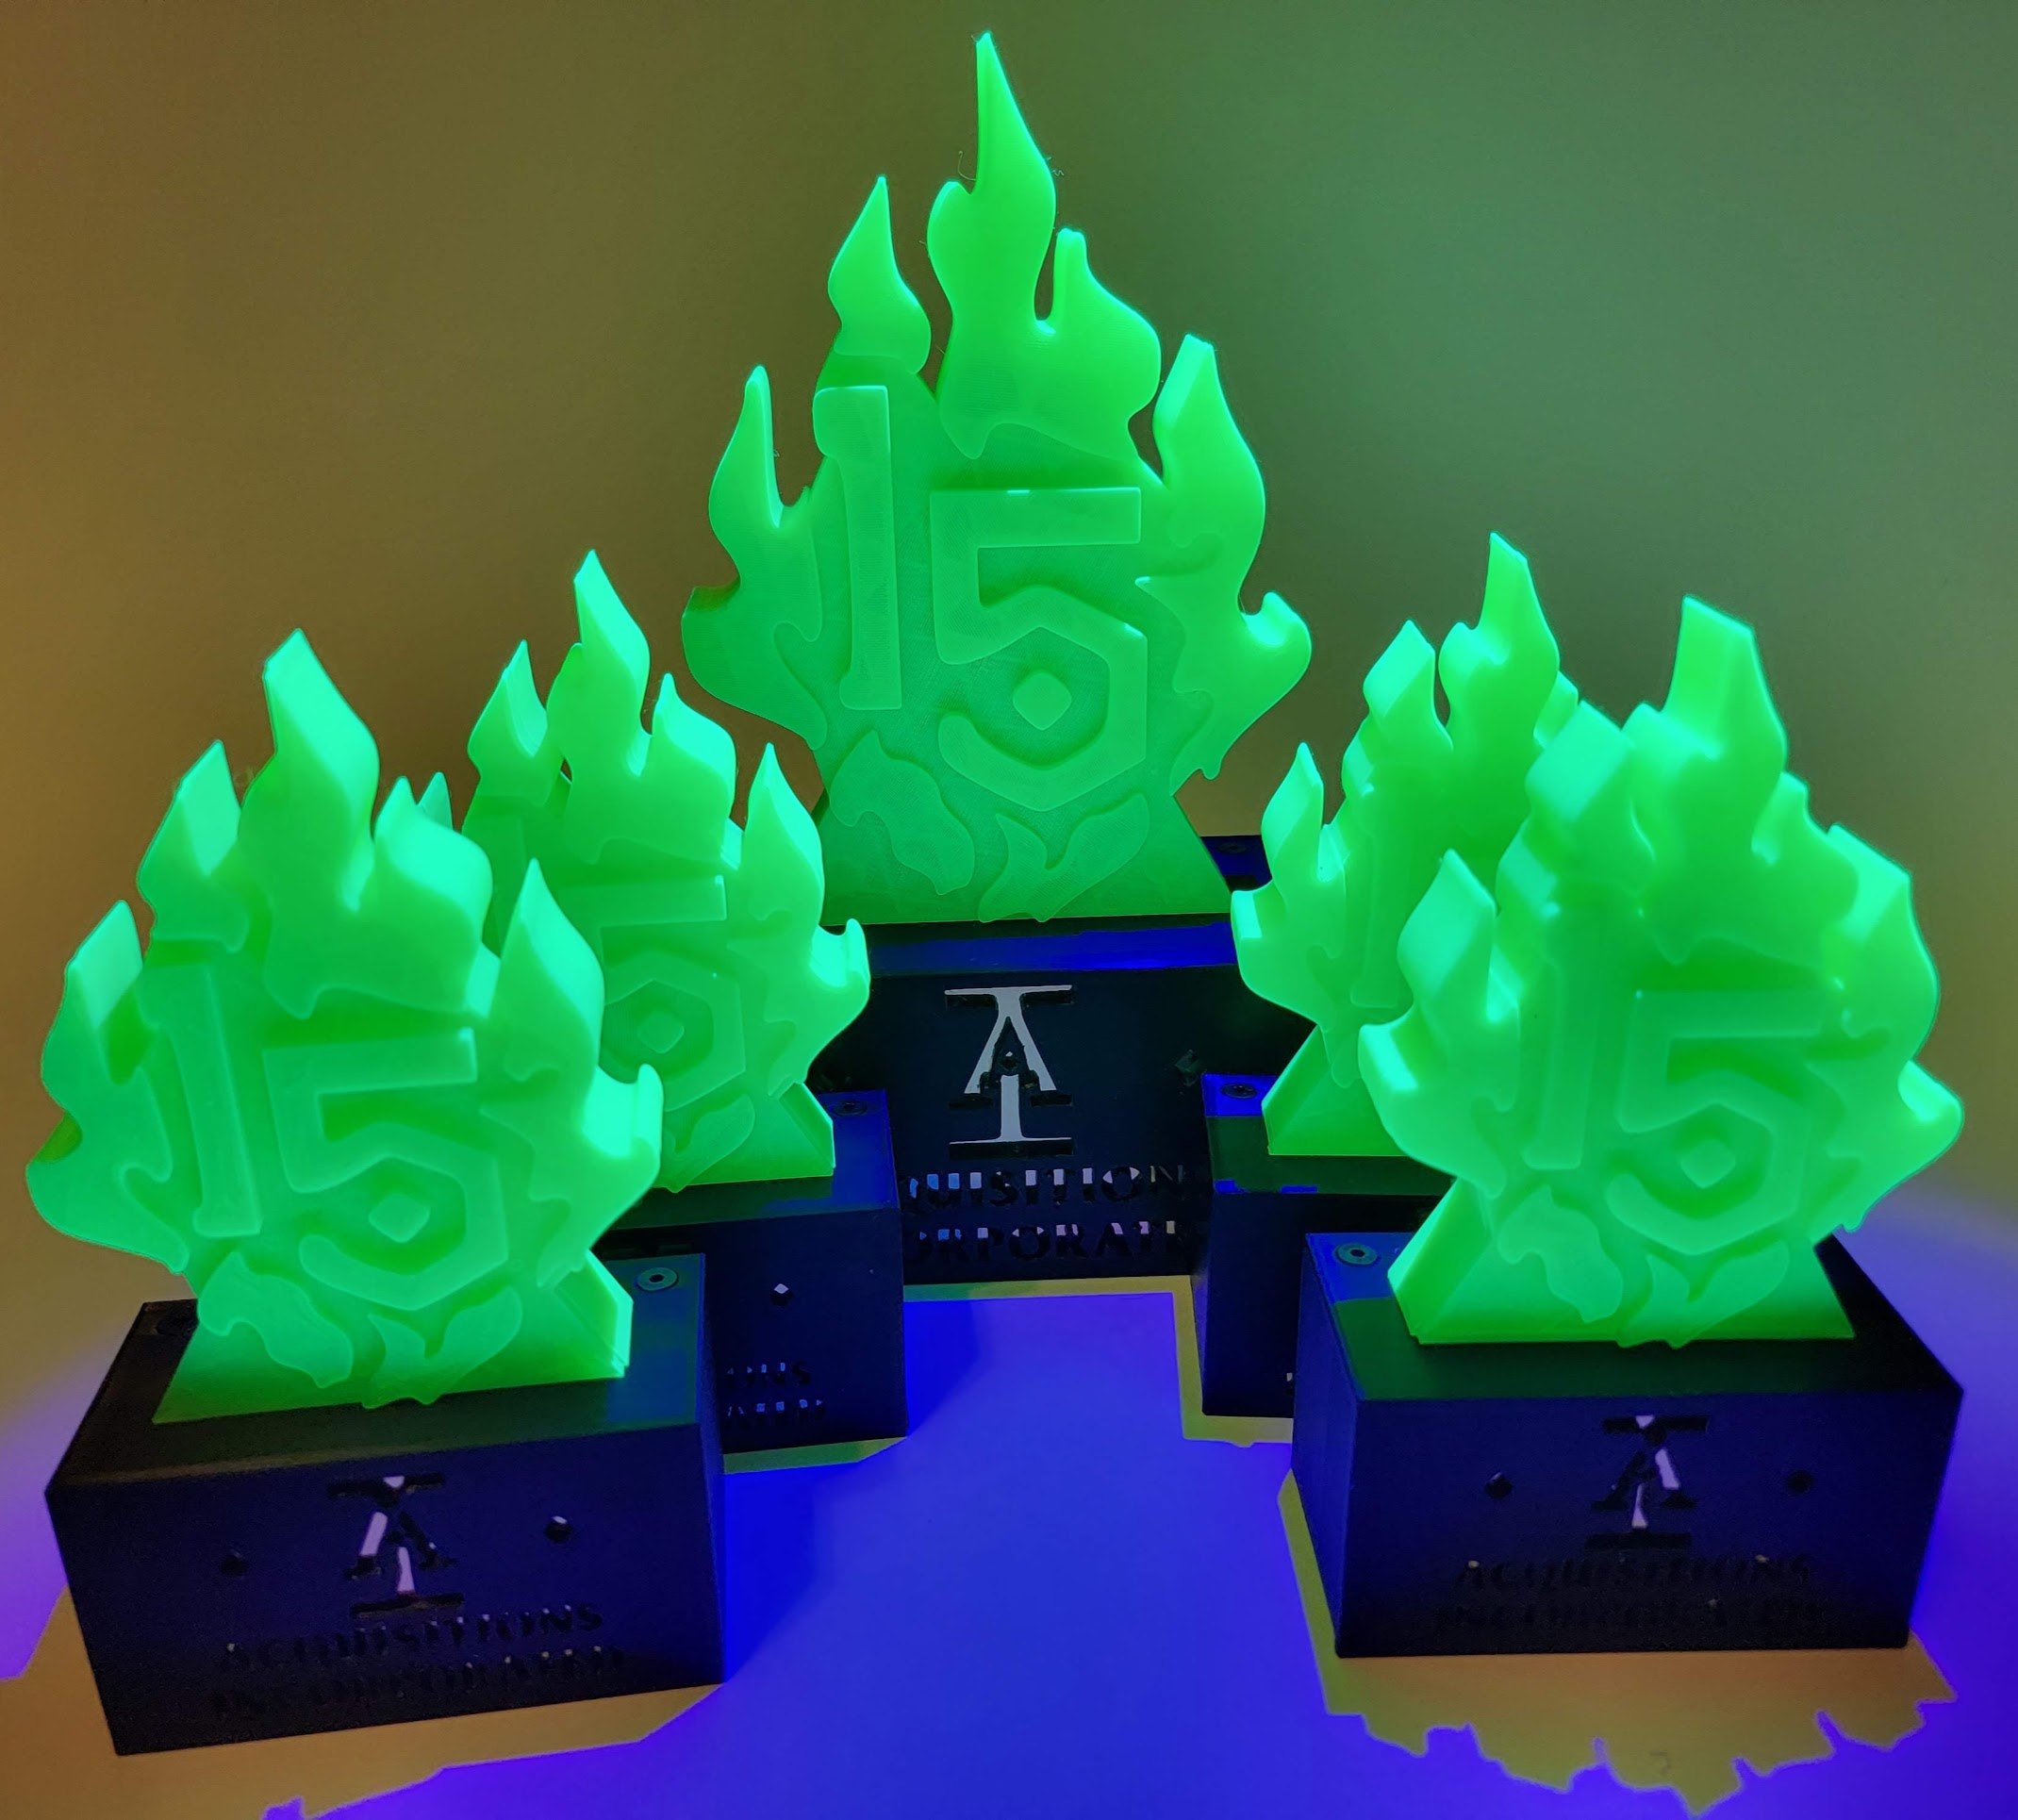
Here they all are, gathered together:
Presentation
I showed off all the goodies to Trystan, Kate, and Jerry at PA HQ. The big statue ended up on display with some other really cool AcqInc related stuff! I was super proud of how everything turned out. I had a great time making everything, and a great time giving it away to some really cool people!