I have become hopelessly addicted to Beastie Bay lately. It's a tricky game to get started in, so I thought I'd share my tips and tricks.
Score & Time
Beastie Bay doesn't really mention this or remind you or anything, but essentially the game keeps a score, called "Clear Points" that it is tallying up whenever you do something significant in-game. At the end of five years, your score is tallied, and this is the score that counts towards your online rankings. You can keep playing after the five year mark, but your score won't count past that point.
Other than this score point, time doesn't really seem to have much meaning in the game. You'll quickly become self-sufficient when it comes to money and food, for instance.
Certain things transfer from one game to the next:
- The entries in the "Info->Combat" menu, which lists all the monsters you've captured.
- The entries in the "Info->Remodeling" menu, which you can either purchase with Medals or discover the correct combination for
- Any upgrades to Survival and Equipment items
- The contents of your inventory (unequipped Equipment items and Supplies)
- Your active party (the 3 monsters who would go into combat next) will become the "starter monsters" for your next playthrough
- Your Medal count
This data is sampled when time runs out (so, after 5 years of play), but you can also choose to reset this to your current game's state by purchasing the Create Transfer Data item at Wairo, Inc for 20,000 gold.
Island Building
When planning your island, you'll want to take into account a few things that the game doesn't quite fully explain until later. A few general tips on island building before we dive into more detailed strategies:
- Most tile improvements effect not only the 8 tiles around them, but some of the tiles further away. Most power-generating structures work this way. Just know that the effect isn't as pronounced the further you get away from a structure.
- Most of the time it's pretty easy to bulldoze and rebuild structures. Most of the time, if you remove the contents of a tile you can rebuild it as long as you're willing to repay the construction cost. "Natural" tiles like woods, mountains, and waterfalls tend to be the exception.
- Later in the game, you'll be able to move the contents of a tile into another empty tile. This is sometimes cheaper than bulldozing and rebuilding, and can preserve natural tiles that you just want to reuse elsewhere.
- Eventually you'll be able to build bridges, but they are expensive at 99 wood per tile. You can't remove bridges that were on your island by default. Keep this in mind when planning your traffic flow!
Tourism
Once you've explored your island a bit, you're bound to uncover the dock. This is the first place (of several!) where visitors will arrive on your island.... eventually. You find this dock long before any tourists actually arrive, and tourism isn't something that's fully explained in the game at any point.
Once you've saved a few residents of other islands, they will come to visit you occasionally. When they do, they will do three things:
- Depart from the dock and make a beeline for a tourist area where they can shop or be entertained
- Depart from the tourist area and make a beeline for a rest area
- Depart from the rest area and return to the dock
At the tourist area and the rest area, they will spend money. They spend some money based on the building they arrive at, and they spend some money to buy something if there is anything present. This is the primary way in which you make money in the game, and money is key to purchasing items and investing in other islands for various improvements.
There's some important island building strategy here though. Tourists will only walk so far from the dock (and, eventually, the other points of entry to your island) to these locations. They prefer to walk along paths, and get tired quickly if there aren't any. So, when you plan your island, make sure you leave room for these paths, and that you leave room around each dock for shops and places to rest.
 For maximum gold output, place harvestable resources near your shopping and resting areas so that your workers will bring "Specialty" items into them.
People and monsters who live in the building or nearby will bring objects into the building for sale. When they do this, you'll see a little "Specialty +1" popup occur. The next time someone visits, they'll buy the item and you'll make a bit of money. Some items sell for more than others, so keep this in mind when planning the area around your tourist and rest areas - you'll want someone nearby to stock the building, and you'll want them to be able to grab high value items. Fields tend to be an easy way to get high-quality items, for instance.
There are many, many buildings which can be built that satisfy the "tourist area" requirement. However, the base buildings for the "rest area" requirement at first appear to be limited. One important remodel to note is that if you add power to a Tourist Spot tile, it can become a Campground, and eventually an Inn or Hotel.
This is somewhat less important than it seems, as people will generally walk halfway across the island to do one or the other of these activities, and there's no bonus whatsoever for conserving their energy. If the routes around your island are decently designed, and you place your rest areas near the center of the map, you shouldn't have any trouble getting tourists to spend money on your island.
Investment
Investing in other islands can bring benefits to your island, primarily in the form of improvements to Tourism.
By far the most important upgrades are the Trade upgrades, which unlock new items in the shop for purchase with gold. Some of these items can make a big difference when taken into battle, so having the latest upgrades is a top priority.
Most of the rest of the investment options unlock more Tourists, who will come to your island and spend money. This has the effect of increasing the rate at which you acquire gold, but past a certain point the marginal utility of gold decreases sharply. You'll have to decide just how worth it it is to invest large sums of gold into your tourism program. Since there's not a lot to buy, I maxed everyone out, but the only result was that I had more gold and nothing to spend it on.
Monster Care and Feeding
Whenever you capture a new monster from a battle, they will eventually end up at your island and look for an empty "Ally's Home" structure to live in. While you can build these anywhere, but there are a couple of things to consider.
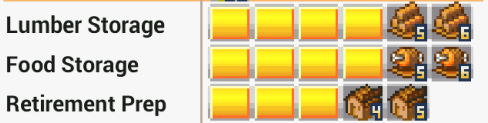
Eventually you'll unlock a building called the "School" from the research project "Retirement Prep" which I believe unlocks as your roster of allies grows large. You can dismiss a monster and set them as an instructor, and then assign them to a school. The 8 monsters who live immediately adjacent to a school can be taught by this instructor. Instead of doing work when they enter the School, they'll stay for a bit and then leave with an EXP bonus. Once the monster is the same level as the instructor, you can't gain EXP very efficiently this way.
It's possible to "share" an instructor with a friend by copying down a code from the game. As this is the internet, there's already a lot of these codes for level 99 monsters floating around, so if you feel like cheesing your way to victory, you can enter these "Magic Codes" and just wait while the EXP rolls in.
If the Nature level of your monster's home is high enough, they'll want to remodel it into a Pasture. A Pasture acts like a tourism location, and can store items for sale. This is not terribly useful, though, since there are so many of this type of building available elsewhere. For at least the first half of the game, I'd suggest that you're better off trying to maximize the amount of monsters you stick around a school, rather than worrying about tourism with them.
Slave Lab... err, I mean, Human Resources
As you explore islands, you'll find more residents for your island. Although they start out in meager accommodations, if you boost the surrounding Civ level enough, they'll want to remodel. Some remodeling efforts require power, like the Restaurant. Most of these specialty remodels make the person's house into a shop. Since you've got the dual benefit of having a shop plus someone to keep it well stocked, these specialty remodels can be a real space saver.
People are also the only ones who will build structures. Monsters will ignore a construction site. People will also ignore construction on their own houses, oddly enough. Once a construction site is set, a person is chosen to build it, and then they will walk from their house to the construction site to being work. Usually this will take a bit of time, and they may stop to eat a snack.
Remodeling
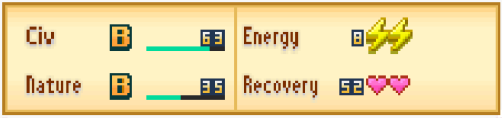 "Recovery" is also shown on the building stats page, although it is only important for resting workers and healing monsters.
If tiles meet certain requirements, they can "level up" and be remodeled into something new, and usually better. There are only a few things that matter for remodeling:
- Civ level, which is primarily important to tourism buildings and homes for humans
- Nature level, which is primarily important to natural tiles and monster habitats
- Power, which is a key catalyst for both - most of the highest-end structures require Thermal Generators
- The Occupant, some humans (for instance, doctors and chefs) have abilities that allow their houses to remodel into special buildings
The max Civ level for any remodel is 20 (Campground->Hotel), and the max Nature level for any remodel is 70 (Zoo->Circus Tent). The maximum power required for any remodel is 128 (Campground->Hotel), which is 2 thermal generator's worth of power!
There are no building remodels in the game that require both a minimum Civ and a minimum Nature level. Focus on one or the other, depending on what basic building you're trying to evolve.
Beastie Bay Mechanics
Medals
To the right of your Food and Wood counters in the upper right of the screen is the Medal counter. These are not explained very well, but they're the "premium" currency in the game. That's not to say they're terribly hard to come by in the early going. You'll get them for exploration and completing certain tasks, as well as rarely as loot or for working a square.
You can also get one for every 10 minutes you're playing the game. This timer doesn't count up while you're in a dialog or a menu. You can only get 10 at a time this way, and in order to get them you must completely quit the game and reload. Remember to save first!
Your workers will occasionally find Medals while harvesting from tiles, with the chances getting better the higher the tile's star rating is. This could be useful in some sort of Medal farming scheme, although this probably only makes sense in the very late game when you're preparing to export your progress for another playthrough.
 When you start seeing stars, you'll need to begin upgrading your Survival gear so it continues to be useful.
Among other uses, you can spend Medals on upgrades in the Items submenu. As the game progresses, all of your survival gear will need leveling up. Once you start seeing stars over objects you used to be able to clear, this means you need to upgrade your gear in order for it to continue to be useful.
By far the most important bit of gear to level is the Bestiary. If you haven't unlocked it yet, it's worth conserving most of your Medals until you do so. It's expensive to level up, but it raises the maximum level of your monsters. Without it, you don't stand a chance at exploring some of the late game areas. Most of the other gear you can live without upgrading, but the Bestiary is a must.
 While there are certainly some "nice to have" upgrades - the Watering Can comes to mind - the most essential is probably the Bestiary.
I personally would suggest sticking to just Survival gear upgrades that cost 3-5 Medals each until you've gotten at least the 50 Medal Bestiary upgrade.
Research
Research has a wide array of benefits for both the island building and monster battling portions of the game. Primarily, though, it's useful for unlocking new building types, and expanding the number of a particular type of building that you can create at the same time.
 Some research projects can be repeated in order to increase the capacity for that tile on your island. Others can only be researched so many times.
Research requires that you invest wood in a research project. Research projects are unlocked primarily through exploration, although they can also sometimes be unlocked under certain conditions on your island or during exploration. For instance, encountering tall grass in exploration mode for the first time unlocks Sickle research. Being low on food unlocks research into farm fields.
Although you can start research with a very small amount of wood, there are some projects that will halt at a certain percentage unless sufficiently funded. I suggest a minimum of 3% per hour to avoid this happening, although by the midpoint of the game wood is so prevalent that research isn't particularly costly.
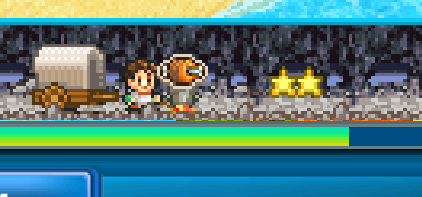
Exploration
Exploration of new lands is key to your progress in the game. It is the primary way in which you gain new abilities. If you read something in this guide and say "my game can't do that!" chances are very good that you just need to explore more. Explore every area at least once.
 It may not look like it, but that's a lightbulb sitting on a treasure chest.
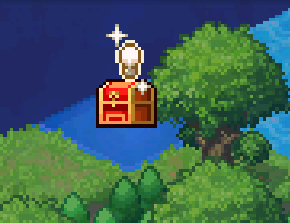
If an area contains a new research topic, you'll see a "light bulb" icon, and if it contains a rare treasure, you'll see a red treasure chest. Likewise, you can tell if there is a unique boss or a citizen in peril by looking for the relevant icons.
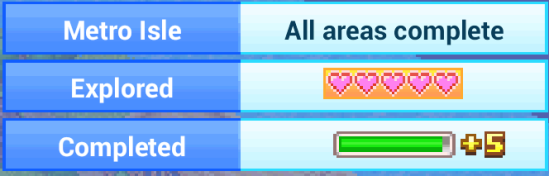 The "Explored" and "Completed" bars in action.
Exploring counts towards two statistics for each island. The first is the "Explored" stat, which counts out of 5 hearts. The second is the "Completed" stat, which is a green bar that goes to 100%. You can fully explore an island without completing it - if this is the case, you'll need to replay dungeons on that island until the Completed stat reaches 100% if you want the Completed bonus.
Wairo, Inc
Wairo, Inc is a shop that you'll unlock at around the midpoint of the game. It's the shop that sells Medals for actual money, and it sells various other premium upgrades in exchange for gold and Medals as well. There's a couple of upgrades here that are worth buying as soon as possible.
One is the automatic battle option, which is different from the "Auto" button you get at the start of every fight. If you buy this and turn it on, you can run dungeons without having to interact with the battle system. Your monsters will auto-attack and use skills, clearing the dungeons with minimal input from you. This can be good for leveling monsters - it's faster, but slightly more interactive than waiting for your monsters to gain EXP from schools.
Another is the ability to capture boss monsters. As soon as you can, you'll want to pick this one up. The boss monsters are among the most powerful the game has to offer, so being able to capture and train them can give your party a big boost.
You can also buy a Slot Scroll here, which gives an allied monster +1 item slots. The first one costs only 10,000 gold, but each time you purchase one, the price goes up by 2 million gold! Wairo, Inc also sells Level Scrolls, which are somewhat less useful and quite a bit less costly.
Finally, as discussed in the Score section, you can update your transfer data to a point later in the game for a price here. This can give you a big leg up on a subsequent playthrough.
Battling
Elements
The elemental matchup between you and your enemy is key to survival. Having the right elemental type in a boss fight can make it easy, or it can make it impossible. There are five major elements, and each does extra damage against another type:
- Lightning does extra damage against Water
- Water does extra damage against Fire
- Fire does extra damage against Wind
- Wind does extra damage against Earth
- Earth does extra damage against Lightning
Robots are considered lightning, and ice monsters are counted the same as water monsters. There's also a 6th monster type, which is essentially "none of the above."
Each element is also weak when attacking monsters of the same element. One way to exploit this is to bring a team of monsters which have the same element as those you expect to fight. If you equip them with Fangs, you can change or remove their elemental attacks. This means that the enemies will be doing little to no damage to you, but you'll be able to tear them up. For instance, if you're fighting on an icy island, if you bring Water monsters equipped with Lightning-aligned fangs, you'll do tons and tons of damage with very little risk.
Equipment
Each monster can equip at least one piece of gear. Different monsters have different numbers of equipment slots, and more advanced equipment takes up more than one of these slots. Although each monster has a variety of stats, the number of equipment slots is definitely a key statistic. It's possible to overcome deficiencies or significantly enhance the strengths of a monster with enough equipment slots.
I find boosting defense with Cloaks and modifying the elemental attributes of a monster with Fangs are worthy uses of equipment slots. You can also teach healing techniques to your monsters with high MP, which can make long expeditions and boss fights easier to overcome.
Equipment can also be leveled up with Medals, although this is rarely worth the investment.
Capturing
Capturing monsters is the primary way that you'll expand your monster roster. This is accomplished by offering them bait when they are weakened. Higher level baits (and baits targeted towards a particular elemental affinity) give better chances at a successful capture. I found even into the middle third of the game that the "Meager Bait" was still pretty effective when used 2-3 times in a row. At some point cash is not going to be an object, so purchasing expensive baits won't be a big deal.
Captured monsters always revert to level 1, although they'll keep whatever star rating they had in the battle. If you have a choice, pick a higher star rating monster to capture. They tend to have better stats and will last you a bit longer.
Capturing a monster gives you just 1 EXP, so it's not a great way to level up.
Monster Power
Monster power is determined in part by their level. The higher the level of the monster, the stronger it is likely to be. However, monsters tend to peak after the first 20 levels or so. The later in the game you get, the better the base stats and per-level stats you'll find on monsters you capture. A level 30 Crabby is no match for a level 30 Undead Pirate, for instance. Be ready to rotate new monsters into your roster as the game progresses.
This is also a good reason to use the School to give a monster its first 10-20 levels. After this point, you should have a pretty good idea as to whether or not their stats are good enough to warrant a position on your team. Nothing is worse than getting a new monster, thinking it's awesome, making a spot for it, and then never using it because the darn thing stinks.
Tips and Tricks
While on an expedition, but outside a battle, you can:
- Change the active party
- Buy new items at the shop
- Change your monster's Equipment
- Use Supplies (herbs, life potions, etc)
You can turn a disastrous expedition into a smashing success if you take a second to recover after a fight that went south, or just before a boss. There's no real reason to get into a fight that you can see coming with the wrong monsters, or with your monsters weakened by previous battles.