Screenshots of your Android phone or tablet are pretty easy to do. On my Nexus 4, for instance, I can capture the screen by pressing the "Power" and "Volume Down" buttons at the same time. Sometimes, though, there's something on your phone that you really want to capture in video rather than in screenshots. This quick guide will help you record your Android device's screen, for free, without needing to root your device at all!
# Stuff You Need
Okay, first things first. You will need:
- A PC, running Windows, Mac, or Linux
- An Android device, running Android 4.4 or better
- A USB cable to connect the two
That's it. There's some software to download on your PC, but other than that you don't need anything else.
If you're not sure what Android version your phone has, you can check it by going into the Settings, then tapping "About Phone." You need the "Android Version" to be at least 4.4 or better. If it's not, bummer... The version of software on your phone is not easy to change, so I won't go into details on that in this guide.
# Configure The Phone
There's no need to "have root" or "flash the ROM" or do anything fancy to your phone in order to make this work. You can do it without modifying the software, buying anything, or voiding your warranty. It just takes a couple of steps.
Go into the phone's settings by tapping the app drawer and then finding Settings and tapping that. If you swipe down towards the bottom of this list, you might see the "Developer options" item. If you don't, do the following:
- Tap "About Phone"
- Tap "Build number" 7 times.
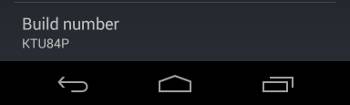
Once you do this, tap the Back icon and you should see "Developer options" near the bottom of the list.
On the "Developer options" screen, swipe down until you see the option for "USB Debugging" and check the box.
Your phone is now set up!
# Configure the PC
We're going to need some tools installed on the PC in order for this to work. You can get them from the [Android Developer Site](http://developer.android.com/sdk/index.html# download).
First, click "System Requirements" and install JDK6 and Apache Ant if you don't have these things installed already.
Then, scroll down and click on "View All Downloads and Sizes" and then scroll further down and pick the correct package for your OS listed under "SDK Tools Only."
Download this and install it. You'll have to pick a directory, by default on Windows this is installed to:
C:\Users\(username)\AppData\Local\Android\android-sdk\
If you change this path, make a note of it.
When the install is finished, run the Android SDK Manager. On Windows, this is installed in the Start menu under the Android SDK Tools group.

The SDK Manager will default to installing a bunch of stuff we don't need. The only things we need are:
- Tools -> Android SDK Tools
- Tools -> Android SDK Platform-tools
- Extras -> Google USB Driver
Anything else you can uncheck. When this is done, click the "Install (number) packages..." button.
# Hooking it All Together
Now that you've got the Android SDK installed and USB debugging turned on on your device, it's time to link them up. Connect the phone/tablet to your PC via USB cable.
If you're running Windows, it might not properly install the USB driver for the debug interface. You may have to go into the Device Manager and manually select the missing USB driver. By default, this is installed in:
C:\Users\(username)\AppData\Local\Android\android-sdk\extras\google\usb_driver
Once this is happy, open a command prompt and navigate to the SDK directory, and then into the platform-tools directory.
Test everything with the following command:
adb devices
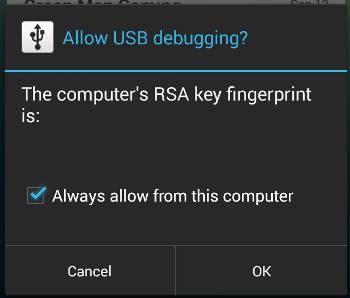
You should see a serial number and the word "device" next to it. If you see "unauthorized," check your phone/tablet, there will be a little dialog you have to tap OK on. Try again and it should show "device" now.
# Capturing Video
All the setup is out of the way now, so it's time to capture your device's screen!
adb shell screenrecord /sdcard/capture.mp4
This will record the video and save it to the device's filesystem at /sdcard/capture.mp4. The maximum length of the recording is 3 minutes.
To transfer the recording to your PC, use:
adb pull /sdcard/capture.mp4
The file will be transferred into the same platform-tools directory as above.
# Restoring Your Phone
If you decide you want to turn all this stuff back off again, it's easy.
Just go back into the Settings menu, then tap Developer Options. At the top, tap the "On" button to turn the developer tools back off again. Simple, yeah?
# Conclusion
It's really easy to capture video off an Android phone. As long as your phone has a new enough version of the Android software on it, it's a really quick process to get it set up.