I play games everywhere - on PC and on consoles. I appreciate both the flexibility of the PC, and the no-nonsense simplicity of console gaming. However, sometimes I really want to use a mouse and keyboard to play games that are only available on consoles! In this article, I'll show you how I modded a controller to allow me to use a mouse and keyboard with my Xbox One.
# Video Overview & Demo
I streamed a few minutes of play and some explanations of the hardware in action, come check it out!
"https://www.youtube.com/watch?v=ZLx4JtBngJI"
# Part 1: Introduction & Alternate Solutions
Consoles and PCs both have their advantages - console games tend to work better on big TVs, where you can lean back and hang out on the couch with friends. PC games tend to do better with the finer grain control allowed by more complex input devices like mice and keyboards. Sometimes, though, games are only available for consoles that you'd really rather play with PC peripherals - I feel this way about console shooters a lot.
Console manufacturers aren't exactly welcoming of the use of alternative input devices to control their boxes. Thus, I had to go to some extremes in order to make this work.
I'll put this disclaimer up front: I am not a lawyer, and I don't know if using a modified controller will get you banned from whatever game or online service you use it with. I did this as a project for my own entertainment, and I have no intention of using it to violate and service agreements or anything of that nature. There's still some chance you could get banned or wreck your controller/console. Proceed at your own risk.
# Alternatives to my Hack
Before we jump into my "overly complicated, because I can, dammit" solution, I'll call out a couple of alternatives.
# Commercial Solution: Titan One
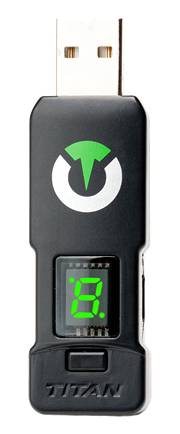
The first is a "turnkey" solution called the Titan One (Amazon Link). It runs around $60-70 or so, but it's plug and play. This device can take practically any type of input - controllers, mouse + keyboard, etc, and make it look like a valid controller for any supported console. I haven't tried this, but it gets pretty good reviews. If you're just not into soldering and writing software, this might be the easiest (but most expensive) way to get there.
The Titan One sits between the controller and the console, and I'm guessing it intercepts the commands sent from the controller, modifying them to incorporate the inputs from the mouse and keyboard.
# Open Source Solution: GIMX
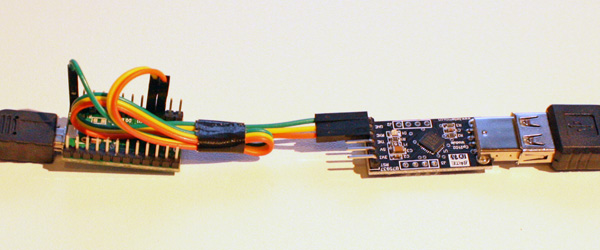
Second is an open source project called GIMX or "Game Input Multiplexer." I first read about this over on Hackaday. You'll need to build or buy a couple of small bits of hardware for this. I picked up the parts for about $10 on eBay, although I haven't yet tried the software. There was a tiny bit of soldering involved, but honestly it would be a good project for someone just getting to know a soldering iron. If you pay a bit more, you can probably get the boards shipped with the headers already soldered on.
The hardware that works with GIMX uses an Arduino board to fake a controller plugged into your console. The Arduino board is controlled via a serial to USB adapter, which is plugged into a PC. The PC can then send commands to the Arduino board, which mimics inputs to the console.
Now that we know what we want to do, and ways that we could solve the problem, let's move on and I'll explain what I did and what makes it unique.
# Onward to Part 2: Hardware Design
# Part 2: Hardware Design
Now, let's start with a clear problem statement. My goal is to get mouse and keyboard support for games working with an Xbox One.
The way I'm going to solve this is by "hijacking" the input of an existing controller, and then I will use a piece of custom hardware to simulate button presses, the analog sticks moving, and so forth. The controller (and whatever it is plugged into) won't have any idea that it isn't a person controlling the game.
# The Sacrificial Controller
I recently retired an old Xbox 360 controller - specifically, a Razer Onza TE. I've had nothing but trouble with the Onzas I've owned. They don't quite recenter right, and the triggers don't always register that they've been pulled fully. I went back and forth with Razer's support on this, and had several replacements that all failed.

Needless to say, I'm not going to miss this hunk of junk. What if I could convert it into a device I could control using my PC? Then, I could use any input device that works on PC, and translate that to buttons pressed and sticks moved on the controller!
(Yes, it's an Xbox 360 controller, and my goal is Xbox One. However, the Xbox One app on Windows 10 accepts a 360 controller just fine, so no issues there.)
# Handling the Digital Inputs
My background in computer engineering (almost enough to minor in electrical engineering) tells me that the buttons on most controllers are probably simple switches that connect two terminals together. Usually, one terminal is connected to a pin on the controller's CPU, and the other is connected to ground. When the switch is pressed, the two pins connect, and the CPU reads that the switch is closed. It then sends a message to the console, telling it that the button has been pressed.
This is not that hard to automate - all I really have to do is connect the CPU pin to a pin on a device that I control. Then I can set that device's pin to ground, and the controller will think someone pressed the button. This is pretty simple to do, so no problem!
# Handling the Analog Inputs
That covers most of the controller's inputs. However, there's still the analog inputs to consider. The analog inputs are the two sticks and the triggers.
Each stick as two axes, and each trigger has one. These are actually implemented using variable resistors, called "potentiometers" or "pots." As you move the stick or trigger, you're actually moving a "wiper" across the pot, which changes the resistance between sets of its pins. The controller's CPU is measuring the voltage across these pins, and can use that information to determine where the stick or trigger is along each axis.
This is a trickier problem to solve, since we have to fake an analog voltage, which is a bit harder than just pulling a pin to ground. Luckily, "digital pots" exist. These devices can have their resistance programmed, allowing them to be set by a computer rather than a person.
# Hardware Requirements
OK, we've determined conceptually how we're going to remove the human element from the controller, and replace it with the PC. Now we actually have to put some hardware together that is up to the task.
We need:
- Something that the PC can talk to - a USB device, probably. This is how we'll send commands to our controller.
- A bunch of digital I/O pins that can be wired up to the buttons.
- A set of digital pots (6 total) that can control the 4 stick axes and the 2 joystick axes.
- A way to control the digital pots and interface them with the rest of the system.
This sounds complicated, but luckily in recent history there have been lots and lots of very sophisticated boards available that can solve a lot of these things in one fell swoop. On top of that, they're easy to program, which keeps the amount of support software we have to write to a minimum.
# The Microcontroller Board: Teensy 3.1
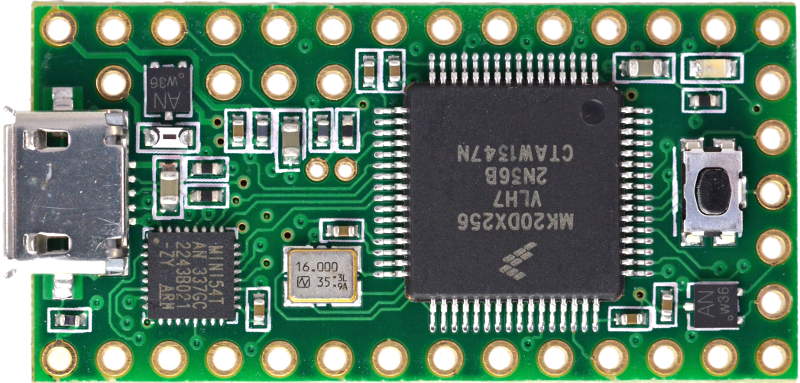
The board I chose for this project is the Teensy, specifically this Teensy 3.1 from Newark. There are a bunch of different ways to get a Teensy - I picked this one at Newark because I wanted to order the rest of my parts there.
The Teensy has a ton of I/O pins (check), it can be controlled over USB via serial (double check), and it can interface with other chips via SPI (triple check)!
# Choosing the Right Digital Pots
Now all we need are some digital pots that are SPI-programmable. There's just a ton of them out there, with all sorts of different values and features.
I measured the total resistance of the controller's pots to be around 20kOhms, so I wanted something that could go at least that high, just in case that was important for the functioning of the analog sticks. There are "volatile" pots that don't remember their last settings when the power is removed, and that's fine since my Teensy will be taking care of setting them up when they power on.
Digital pots are also rated by how many "steps" they have - the more steps, the more fine-grained control I'd have over the sticks. However, the minimum number seemed to be 128, which seems like a LOT for an analog stick. Probably most people can't get more than 3 or 4 different positions between "centered" and "fully pushed." I went with 256 steps anyhow, just because it didn't really matter in terms of cost.
Finally, I chose a digital pot that had 2 pots in one chip. That way, I only had to buy 3 of them, and there are fewer pins to worry about overall. They make some that go as high as 6 pots on a single chip. This would be great for my project, since I need exactly 6. However, it was a little too expensive to justify.
The final part I settled on was MCP4251-503E/P, which runs around $0.75 as of this writing.
# Hacking the Sacrificial Controller
Now that the parts are on order, it's time for demolition. The first step of the mouse and keyboard to controller build is disassembling the sacrificial Xbox 360 controller. I took the controller apart and desoldered almost everything on the board. Rumble motors? Trashed. Switches? Trashed. Analog sticks? Also trashed. Some of it was kind of tricky to desolder, and unfortunately I pulled the via for the X button off. (Whoops!) Luckily, this controller has extra programmable buttons, so I just set one of them to be the X button instead.

In place of all the important switch terminals, I put regular male header pins instead. I did this so that I could have a bit more flexibility in how the controller is put together, and so that I could change out the "brains" on the PC control side if I so choose. Some multicolor jumper wires connect the remnants of the controller board to my breadboard, where the custom hardware is.
# Wiring the Teensy
The Teensy came with a nice full-color, glossy card explaining all of its pins, and that was a big help. I worked with the digial pots first, wiring them up to the SPI bus.
SPI is a serial protocol that has a clock pin, an input pin, and an output pin. There's also a "chip select" pin, which allows me to reuse the same input/output/clock pins for multiple chips. I pick which chip is going to receive a command by pulling the corresponding chip select pin to ground.
Unfortunately, I had a lot of trouble getting the pots working. A lot of the time, the pots wouldn't change their values properly, or they'd report success even when I sent down an obviously invalid command.
I eventually suspected that signal integrity was to blame, so I installed some very small caps and resistors to try to mitigate any sort of weirdness introduced by the breadboard or anything else in my system. This improved things immensely, and got me back on track.
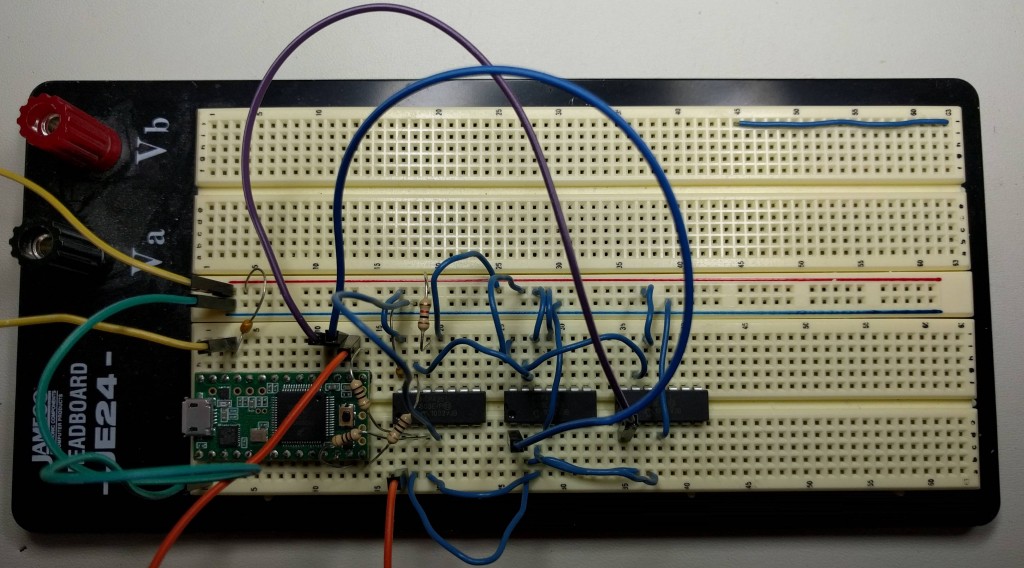
The digital switches were connected to the Teensy's IO pins, and these worked the first time with no issues.
OK, great! Now the Teensy can command the controller. We're one step closer to being able to use a mouse and keyboard with the Xbox One. Now, we've got to write the software.
# Onward to Part 3: Software Design
# Part 3: Software Design
There are two parts to the software for this "mouse and keyboard -> Xbox One" build. One part is technically firmware - the code that runs on the Teensy, and acts as a go-between for the hacked up controller and the PC. The other part is a PC app that takes keyboard and mouse commands and translates them to things the Teensy can understand.
# Teensy Firmware
We'll tackle the Teensy first. Like many hobbyist boards, the Teensy can be programmed via the Arduino software and libraries. Arduino code is kind of close to C or C++, but a bit simplified.
There are two major tasks that the Teensy needs to take care of. It needs to communicate with the PC via USB, and it needs to communicate with the digial pots. (It also needs to interface with the digital buttons, but this is far less complex.)
The Teensy emulates a serial port when plugged into USB by default. This is fine for our uses - it's simple and widely supported. We just need to come up with a protocol for sending messages to the Teensy that can be interpreted as controller commands.
# A Serial Control Protocol
I decided to use 16 bits total for my protocol. Those bits will be divided into address and data.
Address-wise, I need to be able to control A, B, X, Y, LB, RB, L3, R3, D-Pad (4 buttons), Guide, Back, Start, LS (2 axes), RS (2 axes), and the triggers (2 axes). That's 21 different items, so I need at least 5 bits.
Onward to the data bits. The digital pots can handle up to 8 bits of precision, and even though I don't think I need all 8, I might as well build it that way just in case. I also decided to have a few data bits that could be used as flags - for stuff like "turbo" buttons and the like.
So the breakdown is:
- 5 bits for address
- 3 bits for flags
- 8 bits for data
There are other ways to slice this up, and I could optimize this more, but honestly it doesn't make that much of a difference.
From here, I just assigned a unique id number for each button/axis, and made sure the Teensy knew how to map the serial commands to its pins.
In my loop(), I read a byte from serial if available. I have a very simple state machine because I need two bytes to do anything - one for address/flags, and one for data. I store the first byte I read until the second comes along, and then I attempt to process it.
I added a special case for an invalid first byte, where I reset the state of the controller. That way, if my app crashes or quits with the controller in a weird state, I can reset it via a serial command on the next app startup.
[cpp] void loop() { // put your main code here, to run repeatedly: if(Serial.available()) { byte byteRead = Serial.read(); Serial.print("new byte: 0x"); Serial.println(byteRead, HEX); if(cmdByte0 == -1){ if(byteRead >= NUM_BUTTONS<<3) { resetController(); return; } cmdByte0 = byteRead; return; }
int address = cmdByte0>>3;

Serial.print("testing addr: 0x");
Serial.println(address, HEX);
for(int i=0; i<NUM_BUTTONS; i++) {
  if(buttonMap[i].address == address) {
    Serial.print("addr maps to pin ");
    Serial.println(buttonMap[i].pin);
    if((buttonMap[i].type == BUTTON_TYPE_DIGITAL)) {
      if(byteRead != 0) {
        pinMode(buttonMap[i].pin, OUTPUT);
      } else {
        pinMode(buttonMap[i].pin, INPUT);
      }
    } else if(buttonMap[i].type == BUTTON_TYPE_POT_X) {
      spiWrite16(buttonMap[i].pin, wiper0Reg|writeCmd|byteRead);
    } else if(buttonMap[i].type == BUTTON_TYPE_POT_Y) {
      spiWrite16(buttonMap[i].pin, wiper1Reg|writeCmd|byteRead);
    }
  }
}
cmdByte0 = -1;
}
} [/cpp]
Full code is available on GitHub.
# Programming the Pots via SPI
That still leaves the SPI interface to the digital pots, though. Luckily, Arduino comes with a SPI library that makes things pretty easy. It took a bit of reading the spec sheet for the pots to determine the protocol, but after that it was pretty smooth sailing.
[cpp] void spiWrite16(int cs, unsigned short value) { //unsigned short valueSwap = ((value&0xff)<<8) | ((value>>8)&0xff); SPI.beginTransaction(SPISettings(10*1000, MSBFIRST, SPI_MODE0));
digitalWrite(cs, LOW);
//byte readData0 = SPI.transfer((value&0xff00)>>8); //byte readData1 = SPI.transfer((value&0xff)); //int readData = readData0<<8 | readData1; int readData = SPI.transfer16(value);
digitalWrite(cs, HIGH); SPI.endTransaction();
Serial.print("In: "); serialPrint16(value); Serial.print(" Out: "); serialPrint16(readData); Serial.print("\n"); } [/cpp]
Full code is available on GitHub.
At this point, we can send serial commands down to the Teensy from the PC, and the Teensy will use its IO pins and SPI interface to "fake" controller inputs. We're almost done! Now all we have to do is map the PC's mouse and keyboard to the correct serial commands, and this Xbox One mouse and keyboard build will be complete.
# Windows Interface Application
Since I want to use my Windows 10 PC to control the Xbox One, it makes sense to build a Windows application. This application will need to have control over the mouse and keyboard even when it's not the active application so that it will work when the Xbox One app has focus.
# Mouse and Keyboard Interception
I found a library that purports to do just this - Interception. It's pretty easy to install and get started with, and as advertised it captured mouse and keyboard input without issue. I decided to have a "toggle key" that would allow me to determine if my app would allow the key presses I'm intercepting to be passed along to Windows. That way, if I'm in a game that recognizes key presses, I can keep it from responding to things I'm doing on the keyboard that are intended for the controller.
One thing that made the code a bit more complex: analog sticks automatically center, and move relative to center, while mice can start or stop moving and tend to move in absolute directions. For instance, the joystick needs to know how far to tilt in the X direction. However, a mouse is going to report that it has moved X units left or right. Another way of thinking about this is that the mouse reports distance and the joystick requires velocity. Thus, some conversion is required.
[cpp] if (interception_is_mouse(device)) { InterceptionMouseStroke &mstroke = *(InterceptionMouseStroke *)&stroke;
		// mstroke.state is or'ed INTERCEPTION_MOUSE_BUTTON_# _UP, _DOWN
		// mstroke.flags can be INTERCEPTION_MOUSE_MOVE_RELATIVE or _MOVE_ABSOLUTE
		// mstroke.x and mstroke.y are x/y values that depend on RELATIVE or ABSOLUTE
		if (mstroke.flags == INTERCEPTION_MOUSE_MOVE_RELATIVE)
		{
			_stprintf_s(debugStr, (size_t)256, TEXT("%d"), mstroke.x);
			SetDlgItemText(hDlg, IDC_X_MOUSE, debugStr);
			_stprintf_s(debugStr, (size_t)256, TEXT("%d"), mstroke.y);
			SetDlgItemText(hDlg, IDC_Y_MOUSE, debugStr);


			int x_map[7] = { 0, 32, 48, 64, 80, 96, 127 };
			int y_map[7] = { 0, 64, 96, 127, 127, 127, 127 };

			int x, y;
			int sign_y, sign_x;
			sign_y = sign_x = 1;

			/* Get sign */
			if (mstroke.x < 0) sign_x = -1;
			if (mstroke.y < 0) sign_y = -1;

			/* Get magnitude */
			x = abs(mstroke.x);
			y = abs(mstroke.y);

			/* translate magnitude */
			if (x > 6) x = 127;
			else x = x_map[x];

			if (y > 6) y = 127;
			else y = y_map[y];

			/* Compute output */
			x = sign_x*x + 127;
			y = sign_y*y + 127;

			/* clamp */
			if (x > 255) x = 255;
			if (x < 0) x = 0;
			if (y > 255) y = 255;
			if (y < 0) y = 0;

			mouseMoveWatchdog = true;
			sendControllerCommand(BUTTON_RS_X, 0, x);
			sendControllerCommand(BUTTON_RS_Y, 0, y);
		}
[/cpp]
Full code is available on GitHub.
This is one area where I could spend a bit more time tweaking to get the "feel" of the mouse movement the way I want it to. Also, the sacrificial Xbox 360 controller had some issues with its analog sticks, so some of the problem could be in iffy hardware.
Another wrinkle is that the mouse only reports when it has moved, but no movement on the mouse means I need to recenter the joystick. I put together a quick thread that checks if the mouse is idle, and if so, it centers the joystick.
[cpp] DWORD WINAPI mouseMoveWatchdogThread(LPVOID lpParam) { bool controllerCentered = true; int timeoutCount = 0;
while (keepRunning)
{
	Sleep(50);

	if (!mouseMoveWatchdog)
	{
		timeoutCount++;
		/* No mouse interrupt in the last sleep period */
		if ((timeoutCount > 2) && !controllerCentered)
		{
			/* Center the controller */
			sendControllerCommand(BUTTON_RS_X, 0, 127);
			sendControllerCommand(BUTTON_RS_Y, 0, 127);
			controllerCentered = true;
		}
	}
	else
	{
		timeoutCount = 0;
		controllerCentered = false;
	}
	mouseMoveWatchdog = false;
}
return 0;
} [/cpp]
Full code is available on GitHub.
# Sending Commands to the Teensy
With that solved, now I need to pass these key presses to the serial port. I decided to go with boost::asio for this. Boost is a C++ library with a long history, and I've never used it before! It seemed to make the serial communications pretty straightforward. There's some good examples on this page, so I grabbed a variant of that article's AsyncSerial from this GitHub and got it working without any changes.
With all the hardware breadboard'ed and the software compiled, I'm happy to report that the system works! I can play games using the Xbox One app on my PC using my keyboard and mouse! Woo!
# Onward to Part 4: Conclusions, Next Steps, Lessons Learned
# Part 4: Conclusions, Next Steps, Lessons Learned
# How does it work?

Most of my rig works flawlessly in Xbox One games. All the buttons feel responsive, as does the left stick mapped to WASD. Despite the extra steps involved in getting my input to the game, the latency is really not at all noticeable.
On the flip side, the mouse -> joystick mapping still doesn't quite feel right, mostly in the Y direction. I fixed this a bit by upping the sensitivity in-game, but it still feels wrong sometimes. When I return the joystick to idle, sometimes it "bounces" back the opposite direction in-game. I suspect this is a problem with the iffy sacrificial controller, since I'm basically setting the resistance digitally.
# What's left to finish?
Right now, I don't have the Guide button or the D-Pad wired up. There are enough pins on the Teensy to make this work, but the pads on the controller's board aren't through-hole, so I can't solder header pins for them like I did on the other buttons. They're designed for rubber dome switches and aren't as straightforward to mess with. (I take that back - they might be, but I lack the knowledge ;)
The hardware layout is on a breadboard, and I have some solderable breadboard that I might transfer it to at some point, assuming I use it enough to warrant the extra effort.
Also, I think it would be interesting to compare my hack to GIMX, since I have the hardware to put together a GIMX adapter. I'm also a bit tempted to grab a Titan One and stack the three of them up and see which one I like best.
As I've mentioned a few times in this article, I sacrificed a somewhat iffy controller for this build. I didn't want to risk my newer, nicer, working-er... controllers just in case I ran into something I couldn't solve. If Xbox One controllers ever get super cheap, or if I can buy one with some cosmetic or unrelated issues, it might be worth it to upgrade the controller. I made this whole thing modular, so it shouldn't be a problem to swap out the controller board. Then again, most standard controllers use dome switches for A/B/X/Y/Start/Back, which would create more issues if I switched.
# How far can I take this?
Now that I can programmatically alter console game inputs, there are some possible interesting applications to this technology. I could script inputs to the game, or even perhaps use computer vision to capture the game output and create some fully automated game-playing bot. If I take this any further, though, I'll need to be wary of any terms of service issues I might run into.
# Am I satisfied with the results?
I really embarked upon this project out of curiosity. How do controllers work? Is it possible to simulate movement on the analog sticks from a microcontroller? Can I really fool the Xbox One into accepting mouse and keyboard input? How do I map a mouse's movements to a joystick? I feel like, despite the extra work involved versus buying a commercial solution, I learned a lot. Hopefully, by reading this far, you've learned a lot too :)